More than 500 million people interact with Instagram Stories every day, making them among the most promising types of content to post on the app. But you know that blurry gradient Instagram slaps behind your photo when it doesn’t fill the whole Story screen? Yeah, that’s not doing you any favors.
Good news: You’ve got options. This guide walks you through four ways to change your Instagram Story background — from a quick, solid-color fill to a semi-transparent tint hack most people don’t even know exists.
TL;DR
- You can change your Instagram Story background to any solid color using the Draw tool.
- Upload a pre-designed image from your camera roll for a branded, polished Story background.
- Use the highlighter pen trick to add a semi-transparent color tint without hiding your photo.
- Combine a solid color background with an image Sticker for a layered look.
That Default Gradient Just Isn’t Cutting It

When you upload a photo that doesn’t fill the full Story screen, Instagram auto-generates a blurry gradient based on the image’s color palette. Sometimes it looks fine; sometimes it doesn’t.
Instagram Stories are prime real estate for building brand awareness. Consistent colors and intentional design choices keep your content cohesive, even in a format that’s supposed to feel casual.
The fix is easy once you know the tricks. Let’s get into it.
Changing Your Background to a Solid Color (Sneaky Simple)

This is the simplest method: replace the default background with a solid color. It’s perfect for text-heavy Stories or when you want all the attention on a particular sticker.
Pick a color that matches your brand
Before you start, know the hex code you want to use, or at least have a reference image with your brand colors handy. The color picker in Instagram’s Draw tool lets you sample any color on screen — all you have to do is upload your logo or a branded graphic to the Story editor.
Here’s the step-by-step:
- Open the Instagram app and tap either your profile picture on the top left or the create new post icon (+) in the top left to start a new Story.
- Take a new photo or upload one to your Story (it’ll be covered up, so it doesn’t need to be a masterpiece).
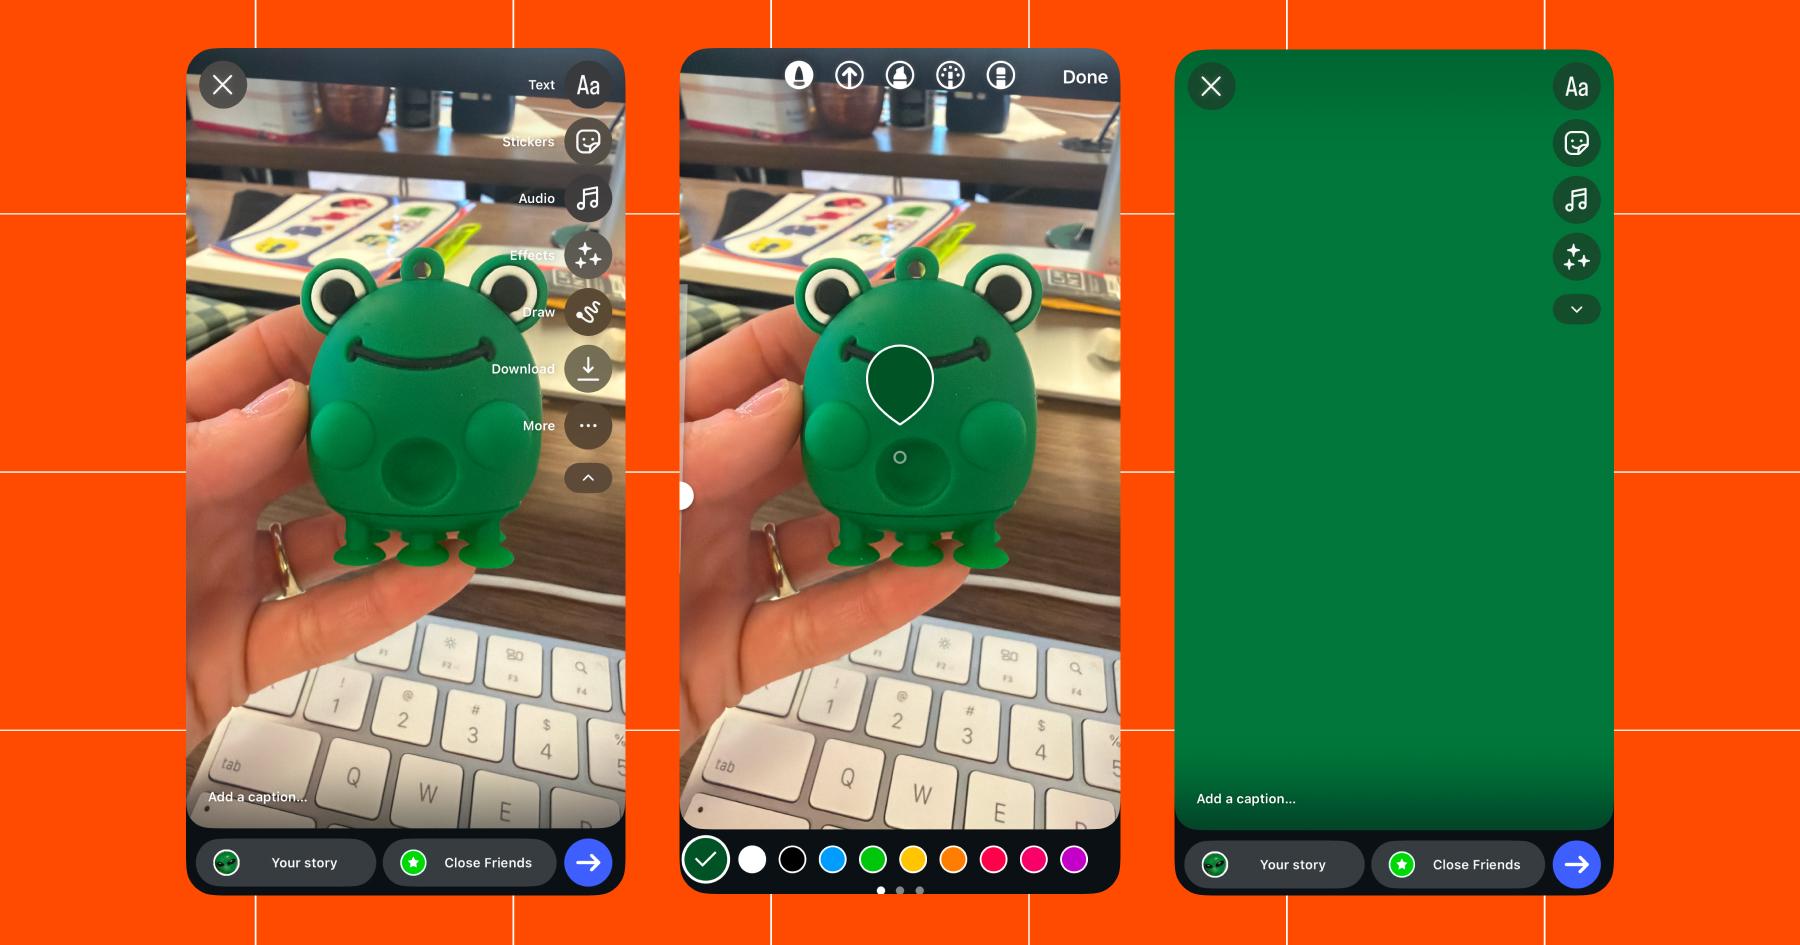
- Navigate to the menu in the top-right corner and tap Draw.
- Pick a color from the bottom options or use the color picker to select a specific shade.
- Once you’ve chosen your color, press and hold your finger anywhere on the screen — it should fill with that solid color.
- Tap Done. You’ll land back on the main editing screen where you can add text, stickers, more images, or whatever else you want.
Pretty simple. But a solid color isn’t the right fit for every type of Instagram Story — you might want something with a little more personality.
Use a Photo as the Background
Uploading a pre-designed image from your camera roll is the most common approach — most people don’t even think of it as a “background” (even though it technically is).
For a background that fills the entire screen without cropping or weirdness, design your image at 1080×1920 pixels — that’s a 9:16 aspect ratio. Tools like Canva have Story-sized templates ready to go, so you don’t have to resize manually.
Here’s how to set it up:
- Open Instagram and start creating a new Story. Choose an image from your camera roll — it can be something you’ve designed or a regular photo.
- That’s it! Add text, stickers, polls — whatever drives engagement — and hit Share.
The trick to a stellar background lies in the design work you do beforehand. A branded template with your colors, fonts, and logo placement strengthens your Instagram aesthetic, rather than making it look thrown together.
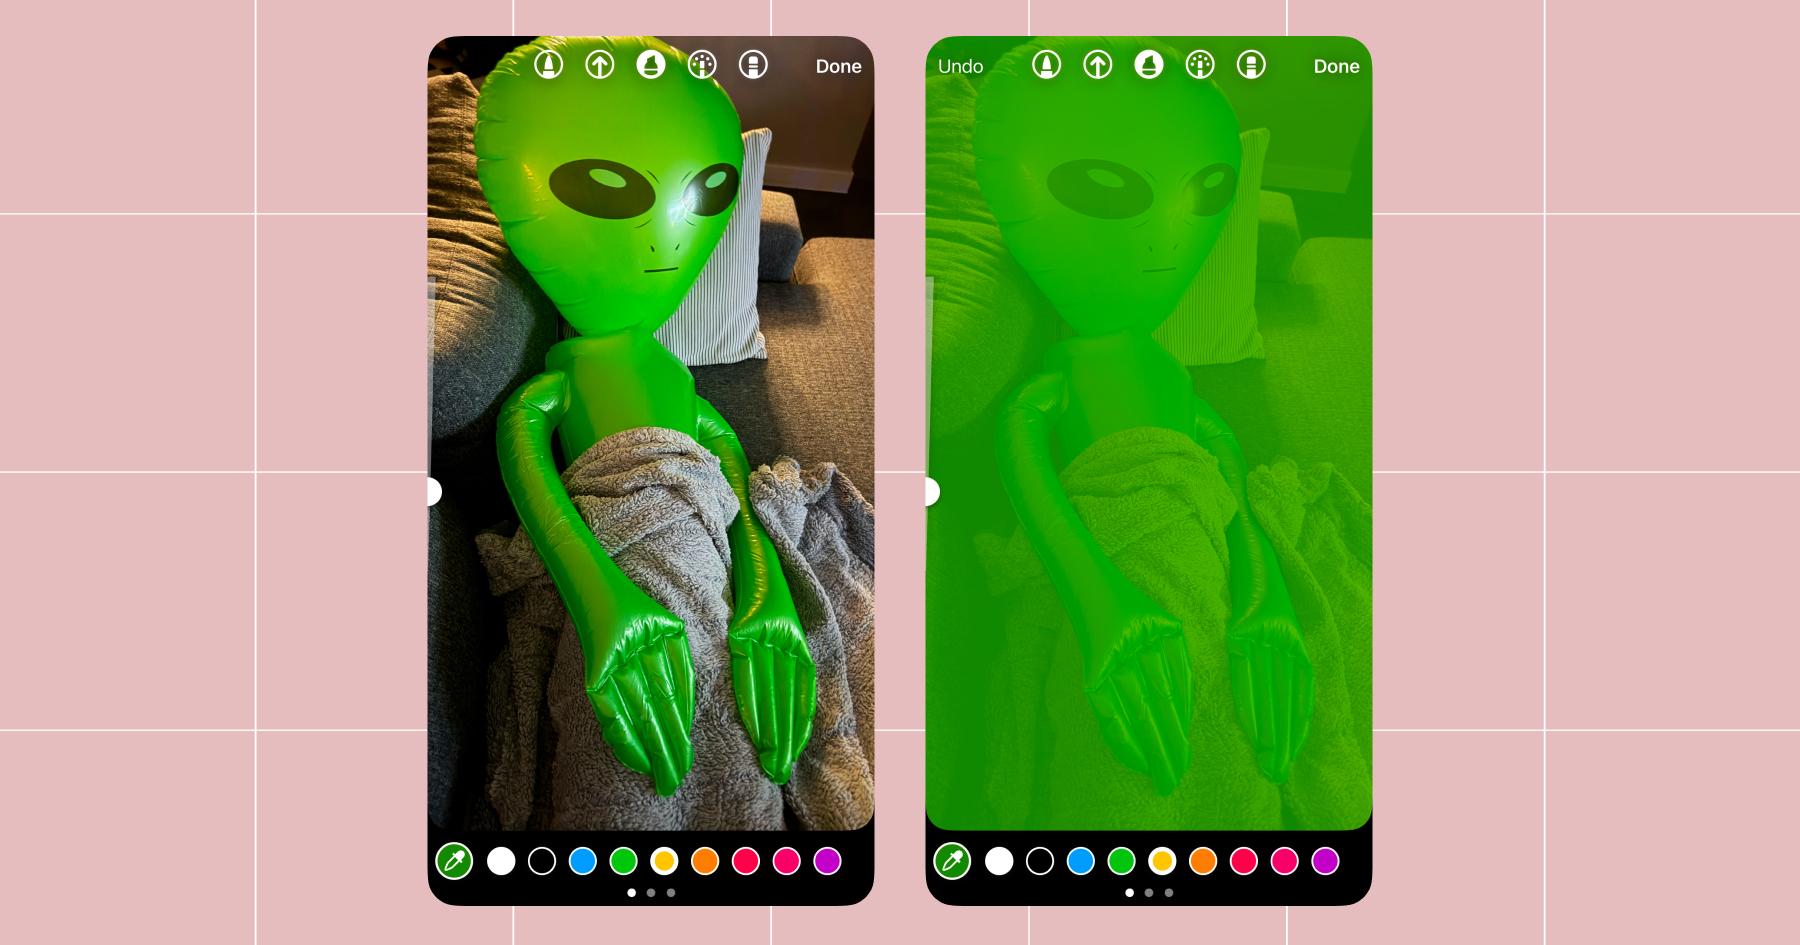
Adding a Tint to Your Story

Here’s the method most people miss entirely: using the highlighter pen to apply a semi-transparent color wash over your photo. Unlike the marker pen (which is fully opaque and covers everything), the highlighter creates a translucent tint — so your image still shows through underneath.
This is perfect for when you want to change the background color on an Instagram Story without covering the picture. Think: making text more readable over a busy photo, or giving a cohesive color mood to a Story series.
When to use the tint vs. a solid fill
Use the solid fill (marker pen + press and hold) to create a blank canvas. Use the tint (highlighter pen + press and hold) to keep the photo visible while shifting the vibe. The highlighter is also great for pulling your Story’s color palette toward your brand colors without losing the image entirely.
Here’s how:
- Open the Story editor and add the photo you want to use as your background.
- Tap Draw.
- Switch to the highlighter pen — it’s the one with an angled tip (usually the middle option in the pen toolbar).
- Choose your color from the palette at the bottom, or use the color picker to sample a shade directly from your photo for a cohesive look.
- Press and hold anywhere on the screen. The entire image will get a semi-transparent color overlay — your photo stays visible underneath.
- Tap Done and add text, stickers, or other elements on top.
Want a deeper tint? Repeat steps three through five with the same color to layer the effect.
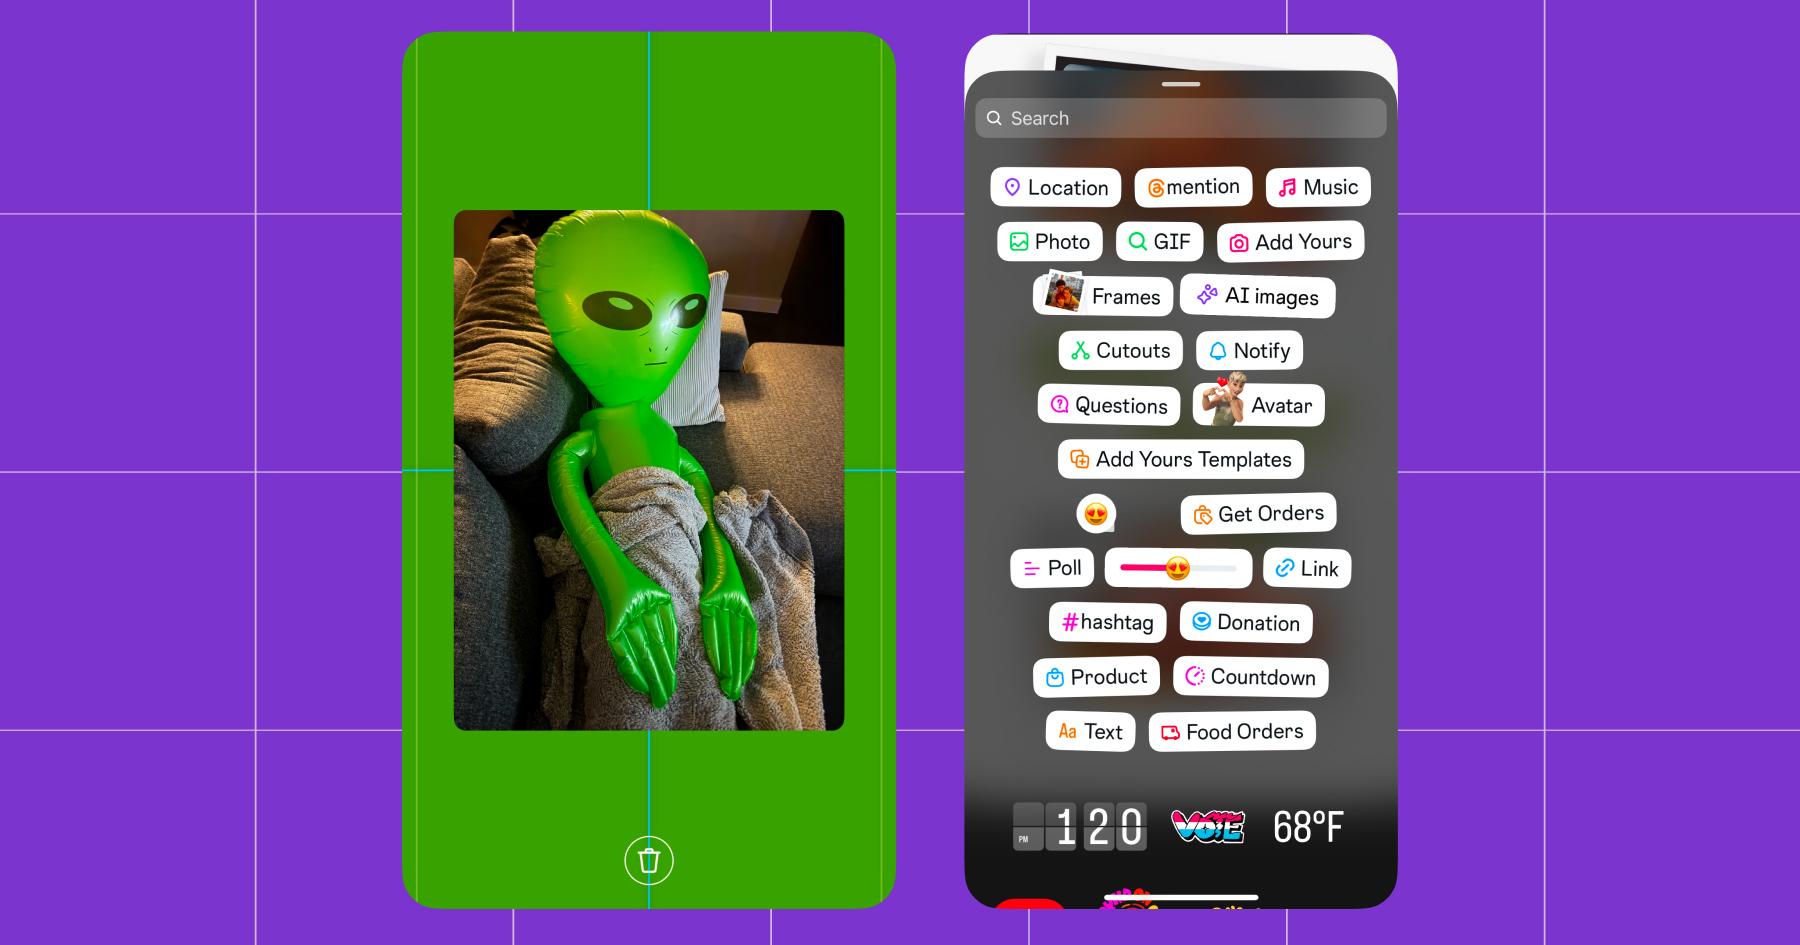
Solid background + photo = chef’s kiss
This one’s great because you get a solid color background with an image layered on top.
- Follow the solid color method until you’re back on the main editing screen with your filled background.
- Tape the Sticker option in the right-side menu. Tap Photo.
- Add the image as a Sticker overlay. Resize and position it however you like.
You can repeat steps two through five to layer multiple images — though three or fewer keeps things clean.
You Don’t Need a Designer (Just These Free Tools)

You don’t need to be a graphic designer to make Stories that look intentional. A handful of free (or cheap) tools can get you there.
Canva is the go-to for most creators; it’s got hundreds of Story templates at the right 1080×1920 dimensions, plus a brand kit feature that lets you save your colors, fonts, and logos for one-click consistency. Adobe Express offers similar template libraries with more flexibility for custom layouts. And if you want something more curated and minimal, Unfold specializes in Story-specific templates that feel editorial without much effort.
Here’s a quick comparison:
Tool | Free tier | Story templates | Brand kit support |
|---|---|---|---|
Canva | Yes | Hundreds | Yes (Pro plan) |
Adobe Express | Yes | Large library | Yes (Premium plan) |
Unfold | Yes (limited) | Curated collection | No |
The pro move is to pick one tool and build a small template library you can reuse. That way, every Story looks like it belongs — even the ones you throw together in 30 seconds.
Your Stories Should Look Like *You*
Changing your Instagram Story background is part of building a recognizable visual identity. When every Story you post has a consistent look, your audience starts recognizing your content before they even read the text. Plus, polls, question stickers, countdown timers, and text all perform better when layered over a background that pops rather than a random gradient or a busy photo.
That’s four ways to change your Instagram Story background: solid color fill, camera roll upload, the semi-transparent tint hack, and the image Sticker overlay. Each one takes less than a minute once you’ve done it a couple of times.
Experiment with all four and see which ones fit your content style. Text-heavy announcements call for a solid color. Product showcases look better with an overlay Sticker. And a pre-designed branded template from your camera roll works for just about everything in between.
Building a business on Instagram? Sign up for Manychat.
Frequently asked questions
Open the Story editor, take or upload any photo, select Draw, choose a color, and press and hold anywhere on the screen to fill it with that solid color.From there, you can add text, stickers, or other elements on top.
Yes. Use the highlighter pen instead of the marker pen in the Draw tool.The highlighter applies a semi-transparent tint over your image rather than a solid fill, so your photo stays visible underneath the color wash.
No. Once a Story is published, you can’t edit the background. You should delete the Story and re-create it with the background you want. (So double-check before you hit Share.)
The ideal size is 1080×1920 pixels (a 9:16 aspect ratio), which fills the entire Story screen without cropping or letterboxing. Most design tools, like Canva, have this dimension as a preset template.


Originally published: Mar 31, 2026, Updated: Mar 31, 2026