No Phone, No Problem: How to Post on Instagram Using a Computer or PC

Sure, you can run your entire Instagram strategy from your phone. But let’s be honest: Navigating brand folders, swapping files, and scheduling posts on a tiny screen isn’t exactly ideal. Especially when your content likely lives on your desktop to begin with.
If you’ve ever airdropped a photo from your laptop just to re-upload it in the app, you already know the pain.
Here’s the good news: You don’t have to do that anymore. From Instagram’s web tools to browser tricks and third-party schedulers, there are plenty of ways to manage your feed straight from your computer.
Ahead, we’ll walk you through the best ways to post on Instagram from a desktop — plus when (and why) you might still need a quick workaround.
Option 1: Use Instagram’s Native Desktop Uploader
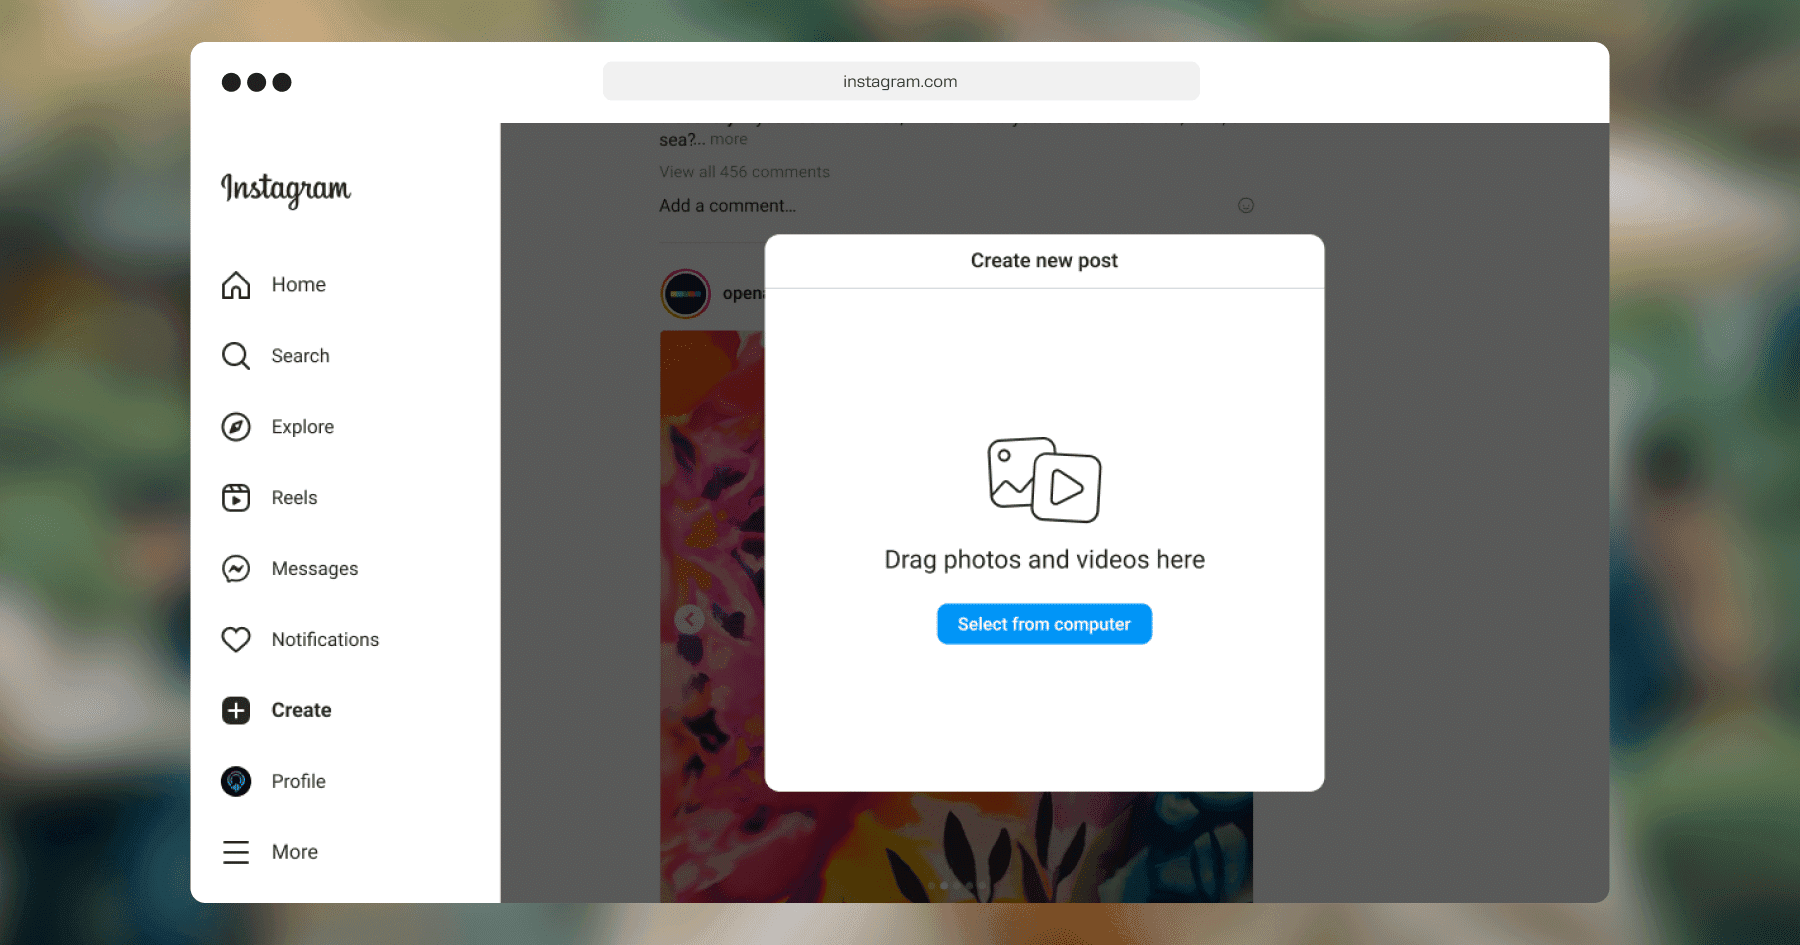
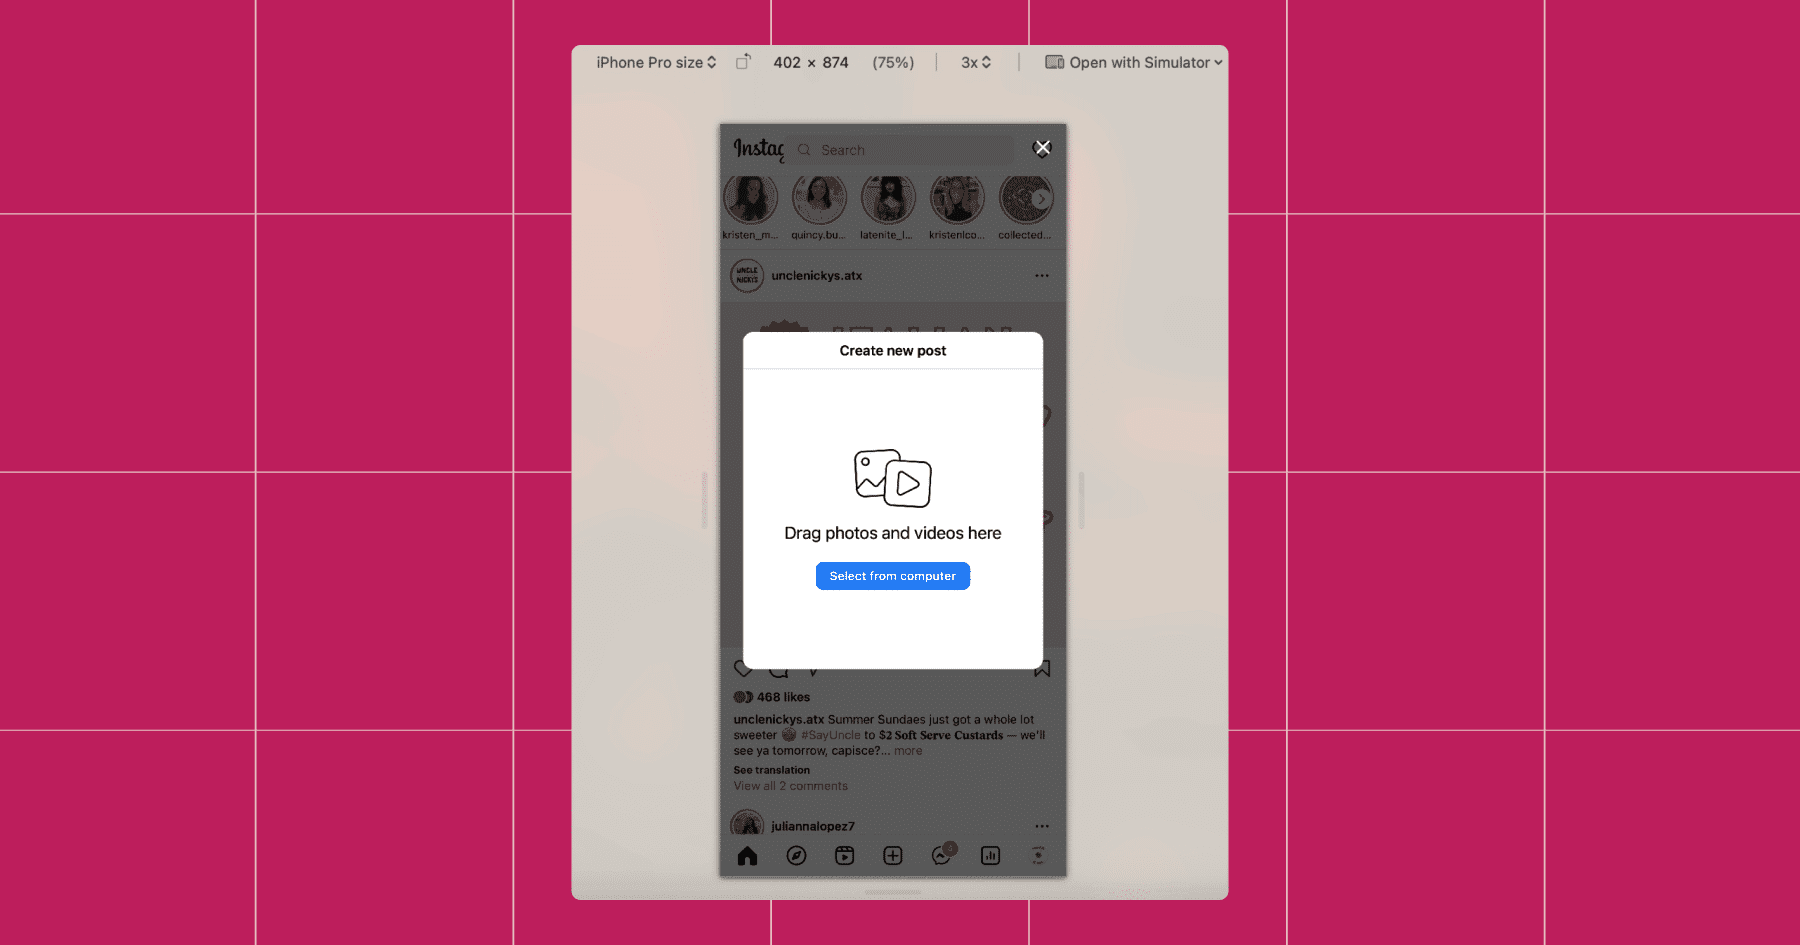
ICYMI: In October 2021, Instagram officially rolled out the ability for all users to post photos and videos directly from their desktop web browsers. No workarounds required — just log in, click a few buttons, and post.
How to post to Instagram from your computer:
- Open your browser and go to www.instagram.com.
- Log in to your Instagram account.
- Look for the + icon in the top navigation bar (“Create”).
- Click the + and select the images and videos you want to upload from your desktop.
- Crop or resize your images as needed.
- Use the basic editing tools to add a filter or adjust brightness, contrast, etc.
- Write your caption.
- Add hashtags, tag other accounts, and drop a location pin if you want.
- Hit “Share” and you’re done!
⚠️ Heads-up on limitations:
While the desktop uploader covers most of your basics, there are still a few things it can’t do as of mid-2025.
- Reel editing tools on desktop are limited. You won’t be able to access Instagram’s audio library, apply AR filters, or use in-app transitions and multi-clip editing features.
- Instagram Stories cannot be created or published from a desktop computer (yet), so you’ll still need to use the mobile app for that.
- Interactive features used in Stories or Reels, like stickers and polls, are not available when posting from a desktop.
Still, if your goal is to post polished feed content quickly and efficiently from your computer, this is one way to do that.
Option 2: Try a Browser-Based Workaround (Safari or Chrome)
While Instagram’s native desktop uploader makes posting pretty simple, some users still run into occasional hiccups, especially when certain features don’t load properly or Instagram’s interface behaves oddly.
This is where browser-based workarounds can come in handy. These methods trick your browser into thinking you’re on a mobile device, which lets you access Instagram’s mobile layout and post from there. They’re not essential anymore, but if you ever need a quick backup option, these two get the job done.
Posting on Instagram from Safari (Mac users only)
If Instagram’s desktop uploader isn’t working for you (or if you just prefer the mobile interface), you can use Safari’s Responsive Design Mode to mimic a mobile device.
But before you can do that, you’ll need to enable the Develop menu if it’s not already visible.
- Open Safari on your Mac.
- Go to Safari > Settings (or Preferences, depending on your macOS version).
- Navigate to the Advanced tab.
- Scroll to the bottom and check one of the following boxes, depending on your system:
“Show Develop menu in menu bar” (for older macOS versions like Monterey)
“Show features for web developers” (for macOS Ventura and later)
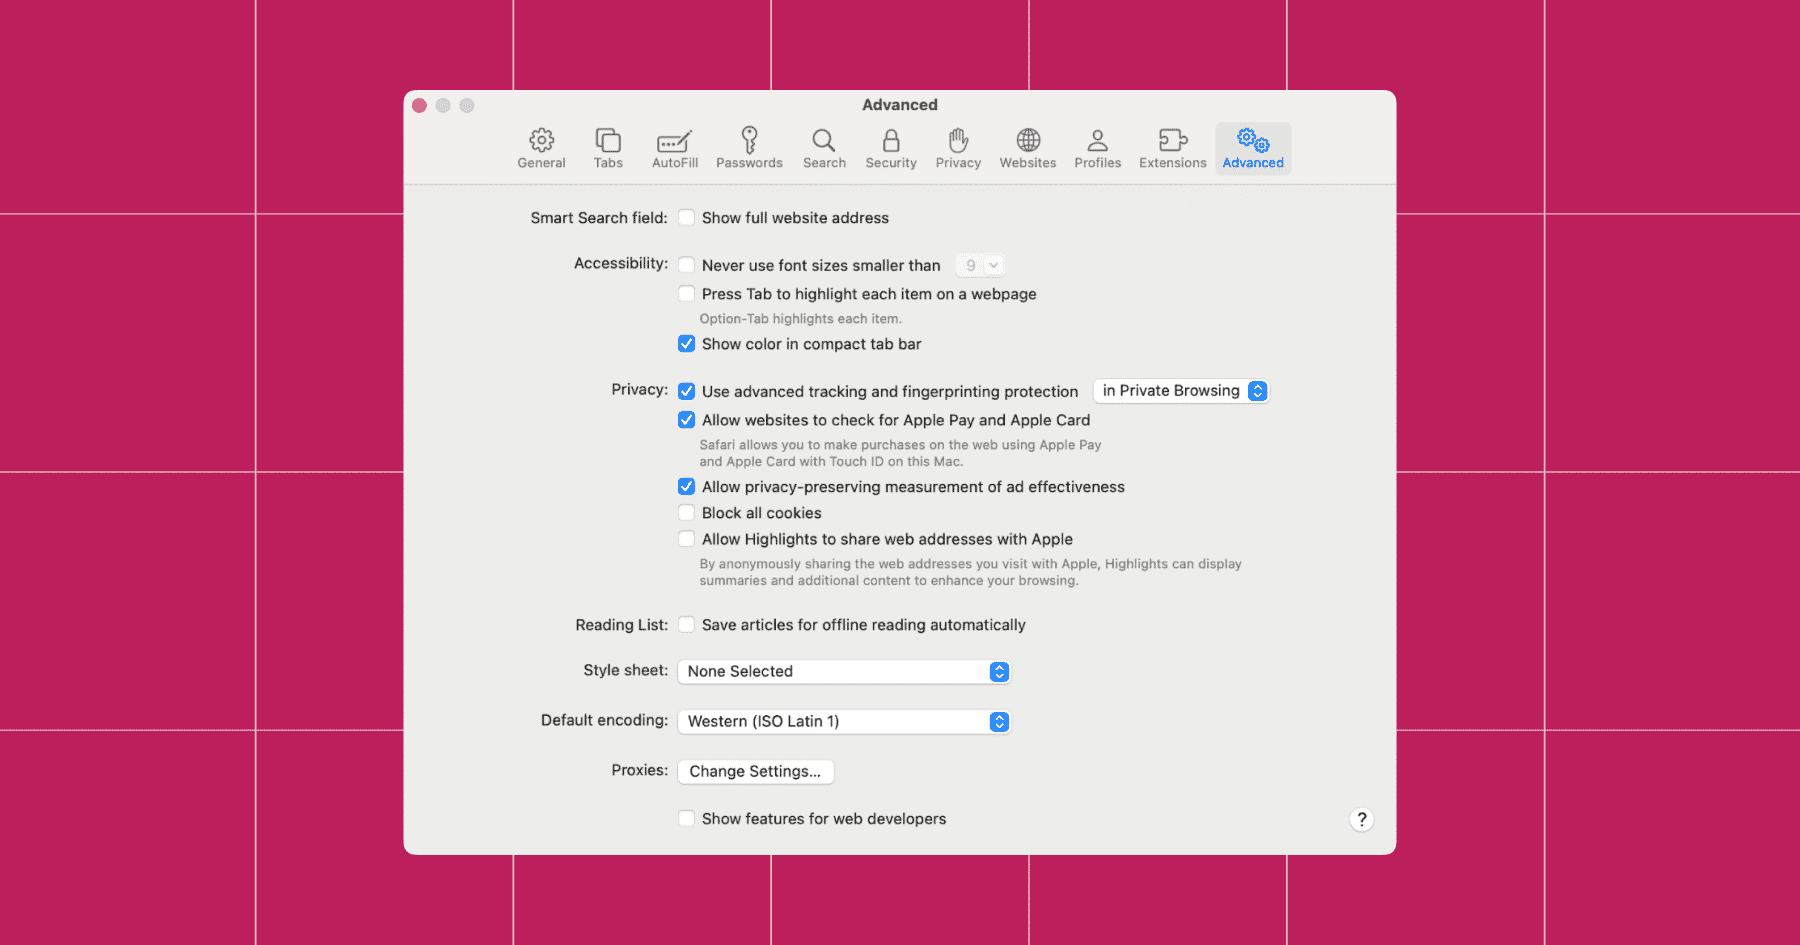
- Once enabled, close the Settings window.
- Visit www.instagram.com and log in to your account.
- In the top menu bar, click Develop > Enter Responsive Design Mode.
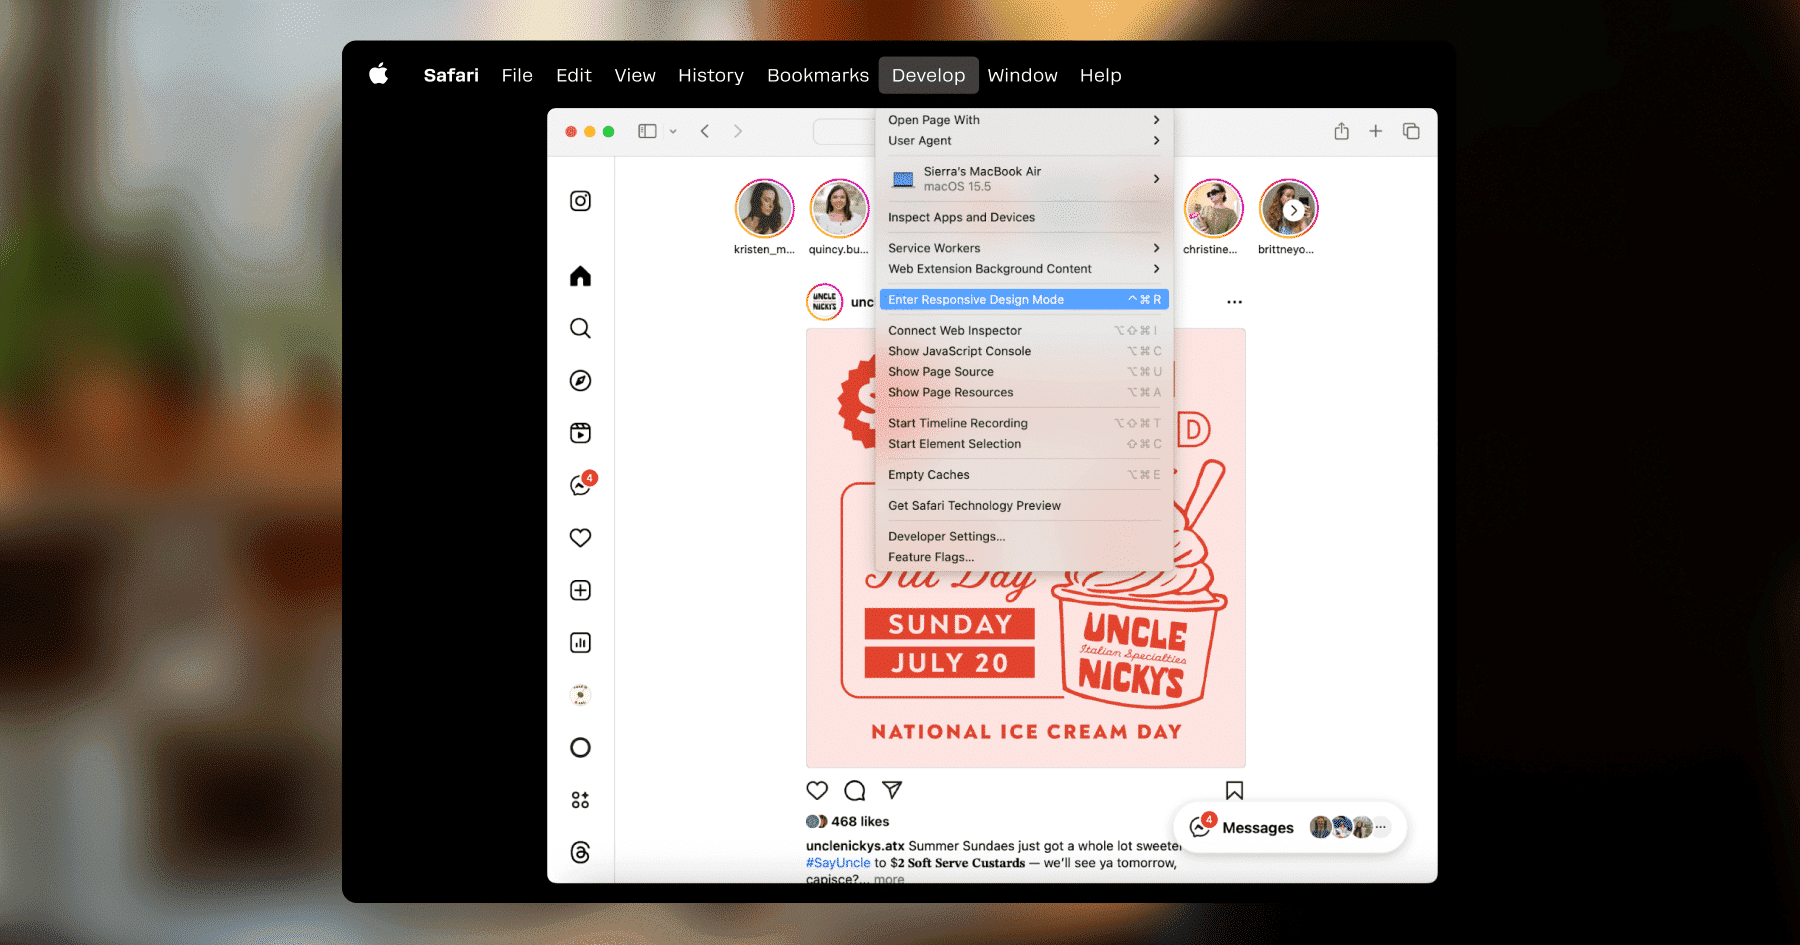
- Choose a mobile device from the dropdown menu (e.g., iPhone 14).
- Refresh the Instagram tab if the mobile layout doesn’t appear immediately.
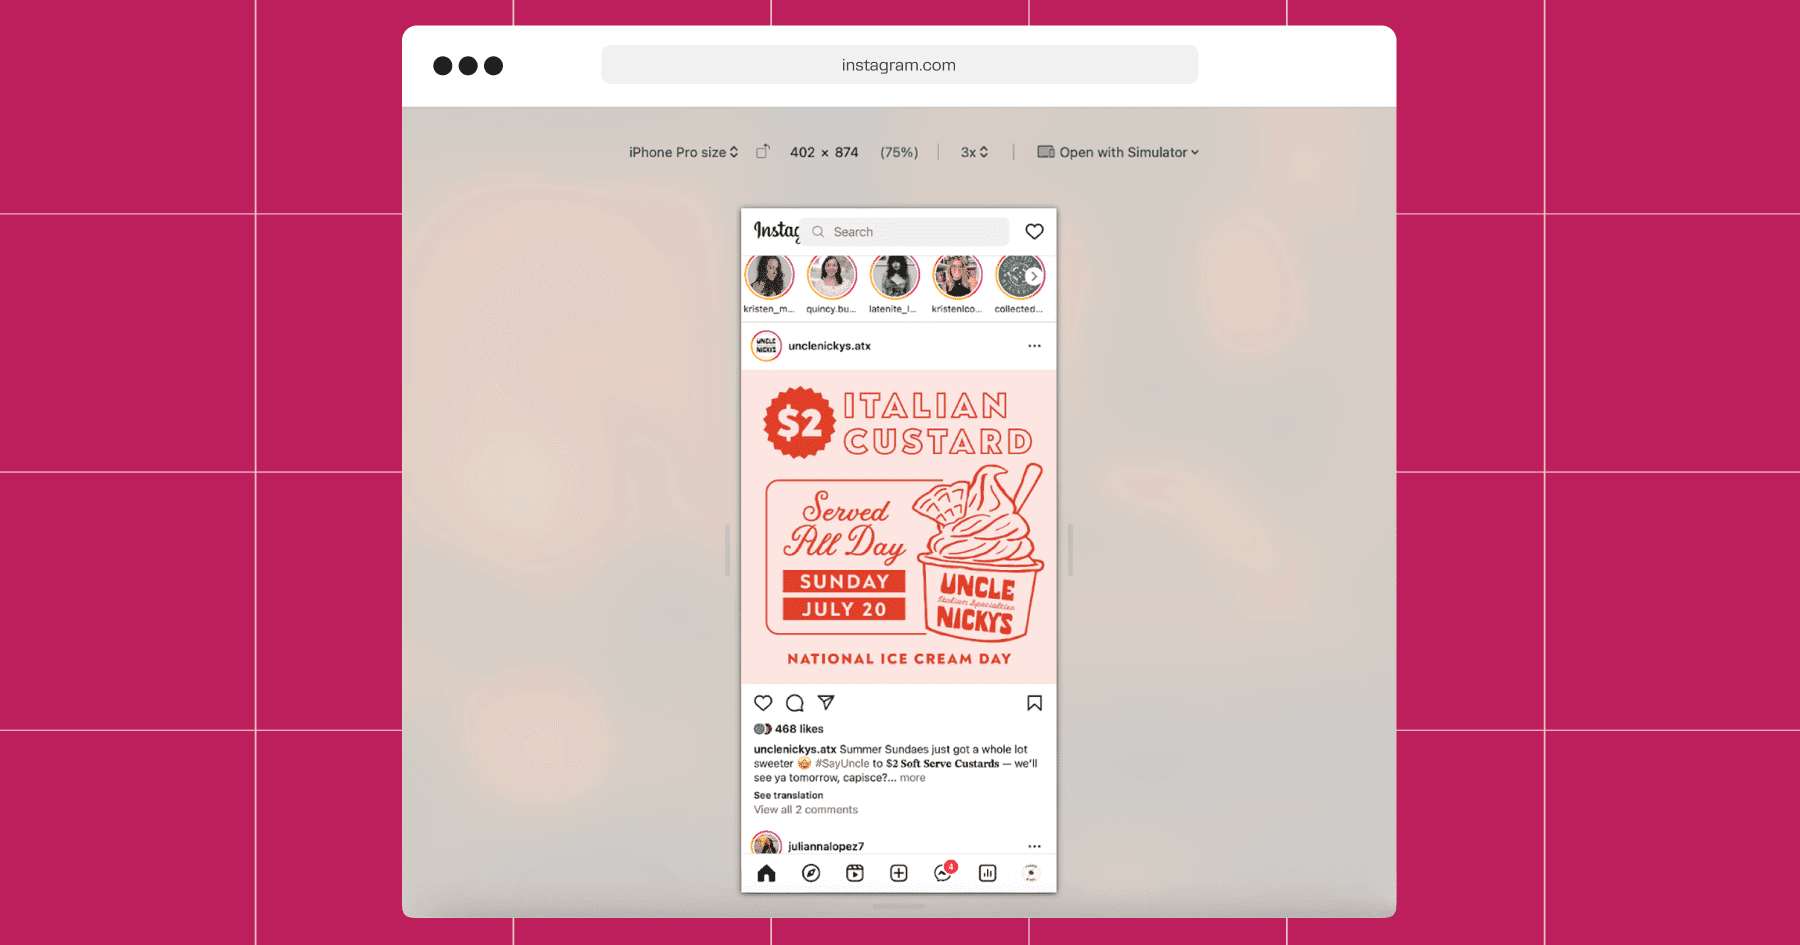
- You should now see the mobile version of Instagram, including the + icon at the bottom.
- Click the +, upload your image or video, write your caption, and hit Share.
Posting on Instagram using Chrome Developer Tools (any OS)
If you’re using Chrome on a PC or Mac, you can activate Developer Tools to emulate Instagram’s mobile layout. It’s a bit more technical-looking, but don’t worry — the process is straightforward.
- Open www.instagram.com in Chrome and log in.
- Right-click anywhere on the page and select “Inspect” (you can also press Cmd + Option + I on Mac or Ctrl + Shift + I on Windows).
- In the panel that opens, click the Toggle Device Toolbar icon — it looks like a phone and tablet side by side (or press Cmd + Shift + M / Ctrl + Shift + M).
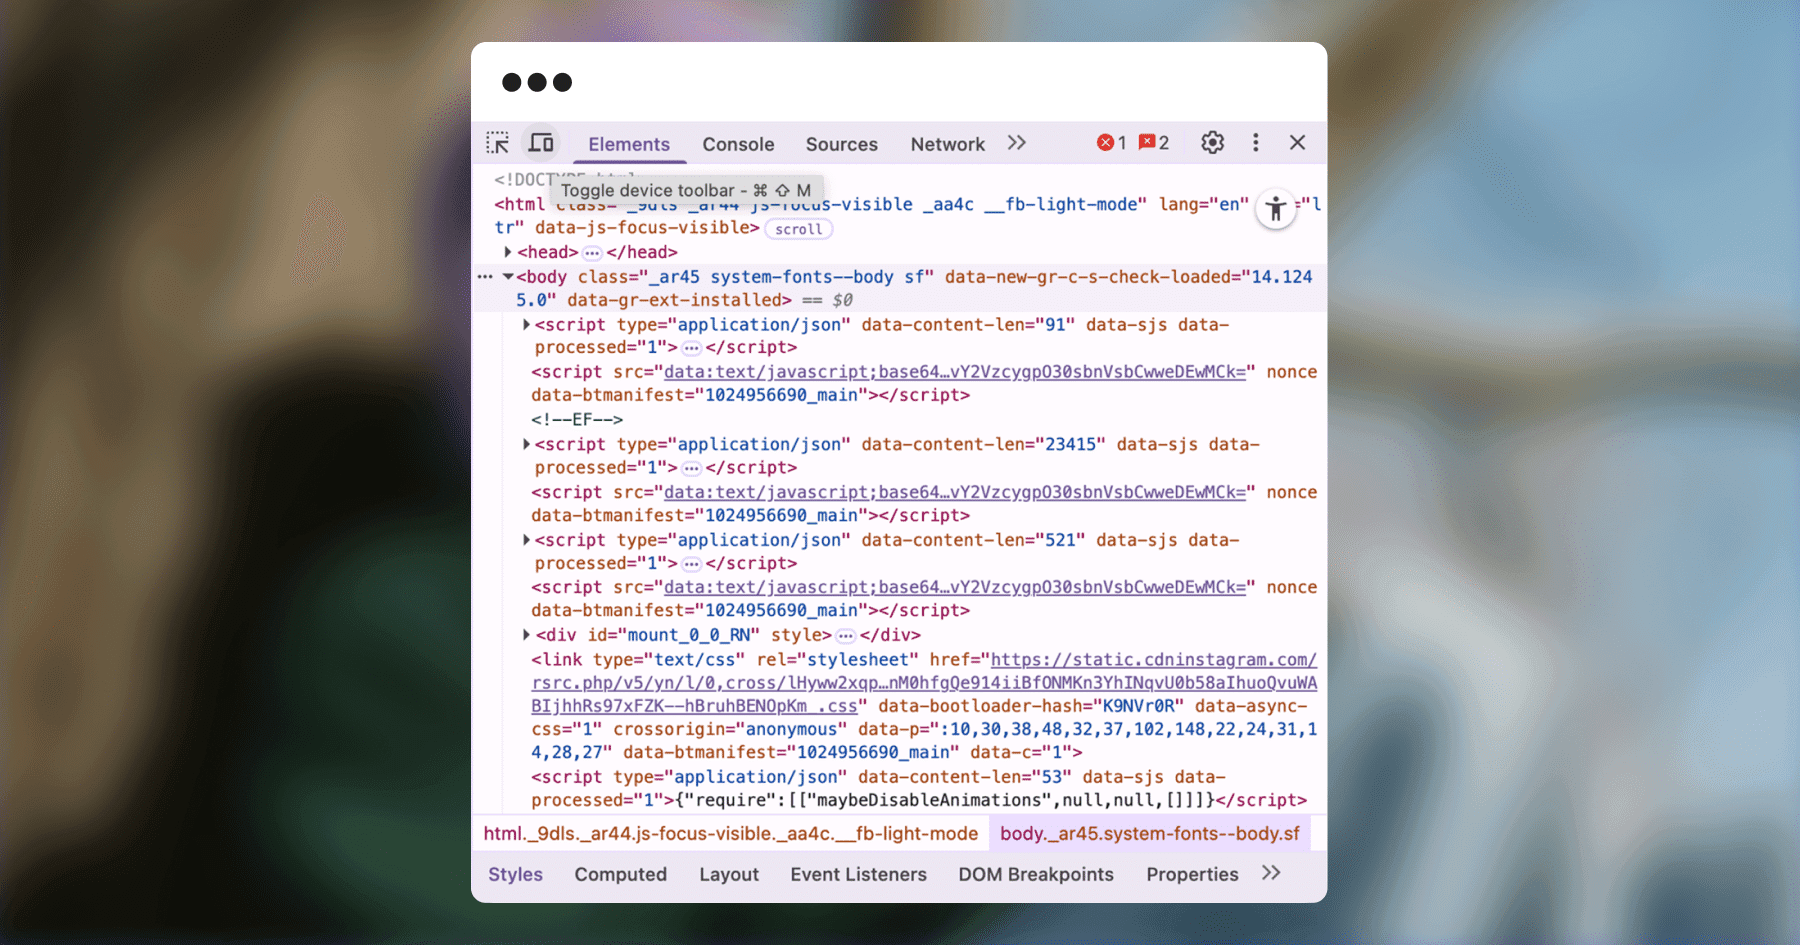
- The screen should now resemble a mobile layout. If not, refresh the page.
- Once the mobile layout appears, click the + icon at the bottom.
- Select the image or video you want to upload from your desktop.
- Add your caption, tags, and location.
- Hit Post.
Most users won’t need these browser tricks thanks to Instagram’s native desktop uploader, but they’re still good to have in your back pocket. They can be helpful if the + icon doesn’t show up on desktop, if you’re using an older browser version or incognito mode, or if you want to replicate the exact mobile layout for formatting consistency.
Option 3: Meta Business Suite
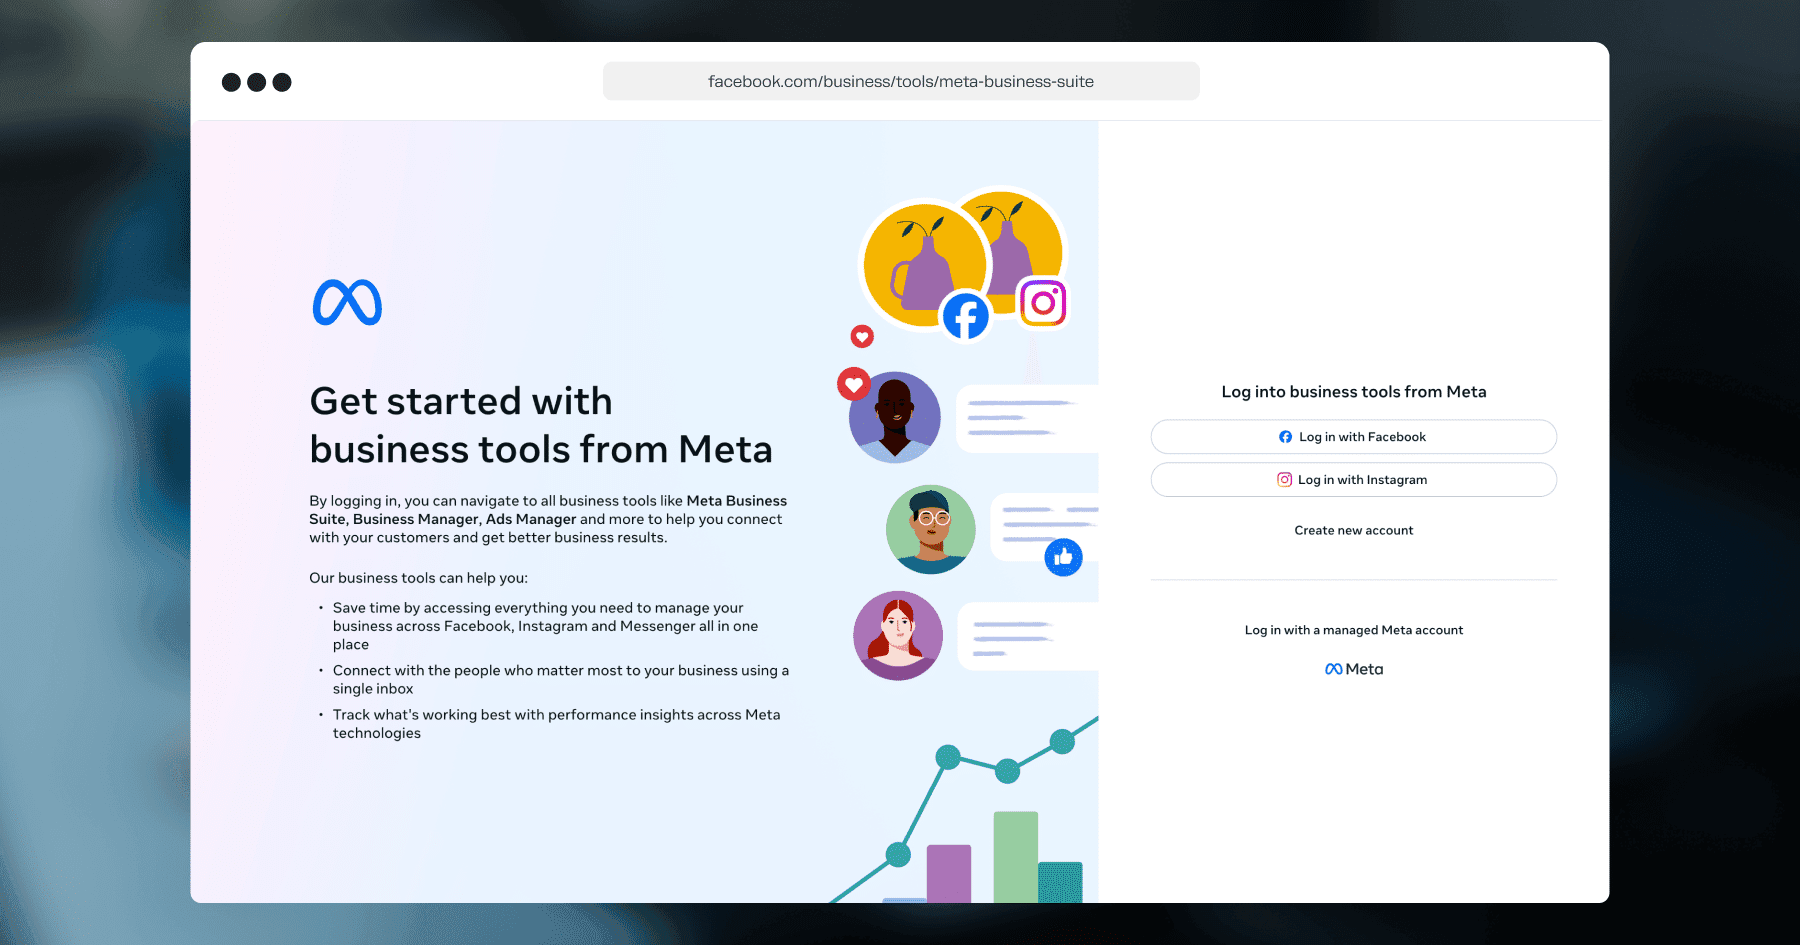
If you’re managing content for both Instagram and Facebook, Meta Business Suite is your all-in-one control center. Whether you’re scheduling a week’s worth of posts or fine-tuning performance across both platforms, this tool makes multitasking a whole lot easier.
Why use Meta Business Suite?
Meta Business Suite is the go-to tool for many social media managers. Here’s why:
- You can cross-post to Instagram and Facebook simultaneously, or customize each post to better suit the audience on each platform.
- You can schedule Reels, Stories, and Feed posts directly from your desktop. Plus, you’ll be able to view a calendar of upcoming posts, making it possible to plan without relying on your phone.
- You also get access to Instagram Insights, including detailed engagement metrics, audience reach, and data on your top-performing content.
How to post from desktop using Meta Business Suite
Note: You’ll need an Instagram creator or business account linked to a Facebook Page to use Meta Business Suite. Personal accounts aren’t supported.
- Go to business.facebook.com and log in with the Facebook account connected to your business’s Instagram profile.
- In the left-hand menu, click Planner or Content (depending on layout updates).
- In the top navigation bar, click the Instagram icon to focus only on your Instagram content.
- Click the “Create Post” button. You’ll get prompted to choose what type of content you’d like to publish: feed post, Story, or Reel.
- Upload your visuals (image, carousel, or video).
- Write your caption, add hashtags, tag accounts, and choose a location if desired.
- Choose Publish Now, Save as Draft, or Schedule for Later based on your content calendar. To cross-post, check the box labeled “Post to Facebook” if it makes sense for your strategy.
- After publishing or scheduling, return to the Calendar View to see everything laid out in a visual timeline.
Option 4: Third-Party Tools for Post Scheduling and Management

If you want more control over your posting schedule or need to manage multiple accounts in one place, tools like Later and Planoly are solid choices.
These platforms simplify scheduling and also add extras like hashtag libraries and visual grid planning that go beyond what Instagram’s native tools (such as Meta Business Suite) currently offer. Just note that to take full advantage of auto-publishing with Later or Planoly, you must connect a Business or Creator account — Personal accounts won’t work.
Posting with Later
Later is one of the most widely used Instagram scheduling tools, especially among creators and small businesses. Its clean interface and drag-and-drop calendar make it simple to organize content from your desktop.
Once your Instagram account is synced with Later, posting is straightforward:
- Log in to your Later dashboard and connect your Instagram account.
- Click “Create Post” and select Instagram.
- Upload your images and/or videos.
- Add your caption, hashtags, and location.
- Choose whether to publish immediately, schedule for later, or save as a draft.
- Hit “Schedule Post” — done.
Some standout features of Later include:
- A visual content calendar where you can drag and drop posts to see how they’ll look on your grid.
- A Hashtag Suggestion tool to help you find and save top-performing tags.
- Auto-publishing for Feed posts and Reels, plus Story scheduling support (you’ll get a mobile notification when it’s time to publish, since Instagram’s API doesn’t allow full auto-publishing for Stories).
Posting with Planonly
Planoly is another favorite amongst creators and brands. Like Later, Planoly supports scheduling for Feed posts, carousels, videos, and Reels directly from desktop once you connect your Instagram account.
Here’s how it works:
- Sign in to your Planoly account.
- Head to your dashboard and select “Create Post.”
- Upload your images and/or videos.
- Add your caption, hashtags, mentions, and location.
- Choose to publish now, schedule for later, or save as a draft.
- Hit “Confirm,” and your post is ready to go.
Planoly’s features are similar to Later’s. Here are a few useful offerings from the platform:
- A visual grid preview so you can see how your posts will look together before they go live.
- A Hashtag Manager that keeps your go-to hashtags organized and easy to reuse.
- A Best Time to Post feature that helps you maximize reach based on your audience’s activity.
Like Later, Planoly allows Story scheduling with reminders when it’s time to publish manually.
Small Screen, Big Hassle. Take It to the Desktop.

Running your Instagram strategy doesn’t have to mean juggling apps, transferring files, or being tethered to your phone. With the strategies covered in this guide, you can plan, publish, and manage your content right from your computer — no thumb cramps required.
Want to take your Instagram game even further?
You’ve got the tools, now get the tactics. Tap into these reads and start making moves:
- 5 Things You Can Do With an Instagram Business Account (& How to Switch to One)
- It Goes Down in the DMs: How to Grow Your Audience on Instagram
- The Only Instagram E-Commerce Guide You’ll Ever Need
And when you’re ready to start turning comments into conversions…sign up for Manychat (it’s free!)
✋ Frequently Asked Questions (FAQs)
1. Does it matter where I post from (phone vs. desktop)?
Yes and no. Posting from a desktop can save you time, reduce errors, and make it easier to plan, but some features (like Reels audio or Story stickers) are still mobile-only. So, desktop is great for planning and publishing, but mobile still wins for reactive, in-the-moment content.
2. If I post from Meta Business Suite, can I still use Manychat automations?
Yes. Manychat works independently of where you post from. Whether you’re using Meta, Buffer, or posting manually, your DM automations will still run in the background.
3. How do I know if I’m “missing” a conversion opportunity in DMs?
If you don’t have a Default Reply or Keyword automations set up, chances are you’re leaving leads on read. A simple automation, such as “DM me ‘shop’ for my product list,” can capture passive interest before it fades away. Your inbox shouldn’t be a dead end.
4. Is there a way to tell which platform is driving the most DMs or leads?
Yes, you can do that with smart Keyword naming. For example, if you use “promo” as a CTA in your Reels and “discount” in Stories, you’ll know exactly which format is driving traffic.
5. I don’t post that often. Should I still automate?
That’s up to you. However, even simple automated responses to terms like “help,” “hours,” or “shop” can save you time and give your followers the information they need, when they need it.


