
If you’ve ever manually typed out the same set of email addresses multiple times in one week, you already know why Gmail email groups exist.
Whether you’re coordinating with clients, looping in your team, or sending updates to brand partners, Gmail’s group email feature saves you from the tedious copy-paste routine. Plus, it’s a great substitute for a more formal email list if you’re a growing creator or small business.
But there’s a catch: Gmail doesn’t actually have a “groups” button. Instead, you have to create groups through Google Contacts labels. It’s simple once you know where to look, and this guide will walk you through the whole thing.
TL;DR
- Gmail email groups work through Google Contacts labels. You create a label, add contacts to it, then type the label name in the “To” field when composing an email. Everyone on that label gets the message.
- The whole setup takes about two minutes: Open Google Contacts, create a label, add your people, and done.
- Google Contacts labels (personal groups) differ from Google Groups (shared inboxes with their own email addresses). Most small businesses and creators just need the label method.
Stop Typing Email Addresses One by One

If you’re emailing the same group of people more than once — your launch team, your suppliers, your agency contacts — typing out everyone’s email address manually every time is a waste of time. Instead, you can use a group to:
- Reach everyone in one click. Instead of remembering individual email addresses, all you have to do is type the label name, and Gmail will populate the list of recipients for you.
- Make fewer mistakes. Because your contacts are saved and labeled in advance, you don’t have to manually type addresses, risk typos, or accidentally leave someone off an important thread.
- Be consistent across sends. Whether it’s a weekly team update or a monthly client check-in, the same group gets the same email. You’ll never wonder if you left the account manager off the thread.
Labels vs. Google Groups: They’re Not the Same Thing

Here’s where most people get confused: “email group in Gmail” can mean two completely different things.
A Google Contacts label is a personal shortcut. You tag a bunch of contacts with a label name (like “Launch Team” or “Podcast Guests”), and then type that label name into the “To” field when composing an email. It’s private to your account; nobody else can see or use your labels. There’s no shared inbox, no group email address. It’s just a faster way to email multiple people at once.
A Google Group, on the other hand, is a standalone product. It gives your group its own email address (like [email protected]), a shared inbox, posting permissions, and member management. It’s designed for organizations using Google Workspace — think company-wide or departmental mailing lists.
For most creators, freelancers, and small business owners, a Google Contacts label is all you need. Google Groups makes more sense if you’re running a larger organization and want a shared group email address with permissions.
Feature | Google Contacts label | Google Group |
|---|---|---|
Own email address | No, you type the label name in the “To” field | Yes, [email protected] |
Shared inbox | No, only you can use the label | Yes, members can view and reply to group threads |
Permissions and roles | None; it’s your personal shortcut | Yes, owners, managers, and members with different access levels |
Setup complexity | Two minutes, no admin needed | Requires Google Groups setup (and Workspace for org-level features) |
Best for | Freelancers, creators, small teams, personal use | Organizations, departments, company-wide mailing lists |
How to Set Up Your First Gmail Email Group

Here’s how to set up your first email group using Google Contacts labels:
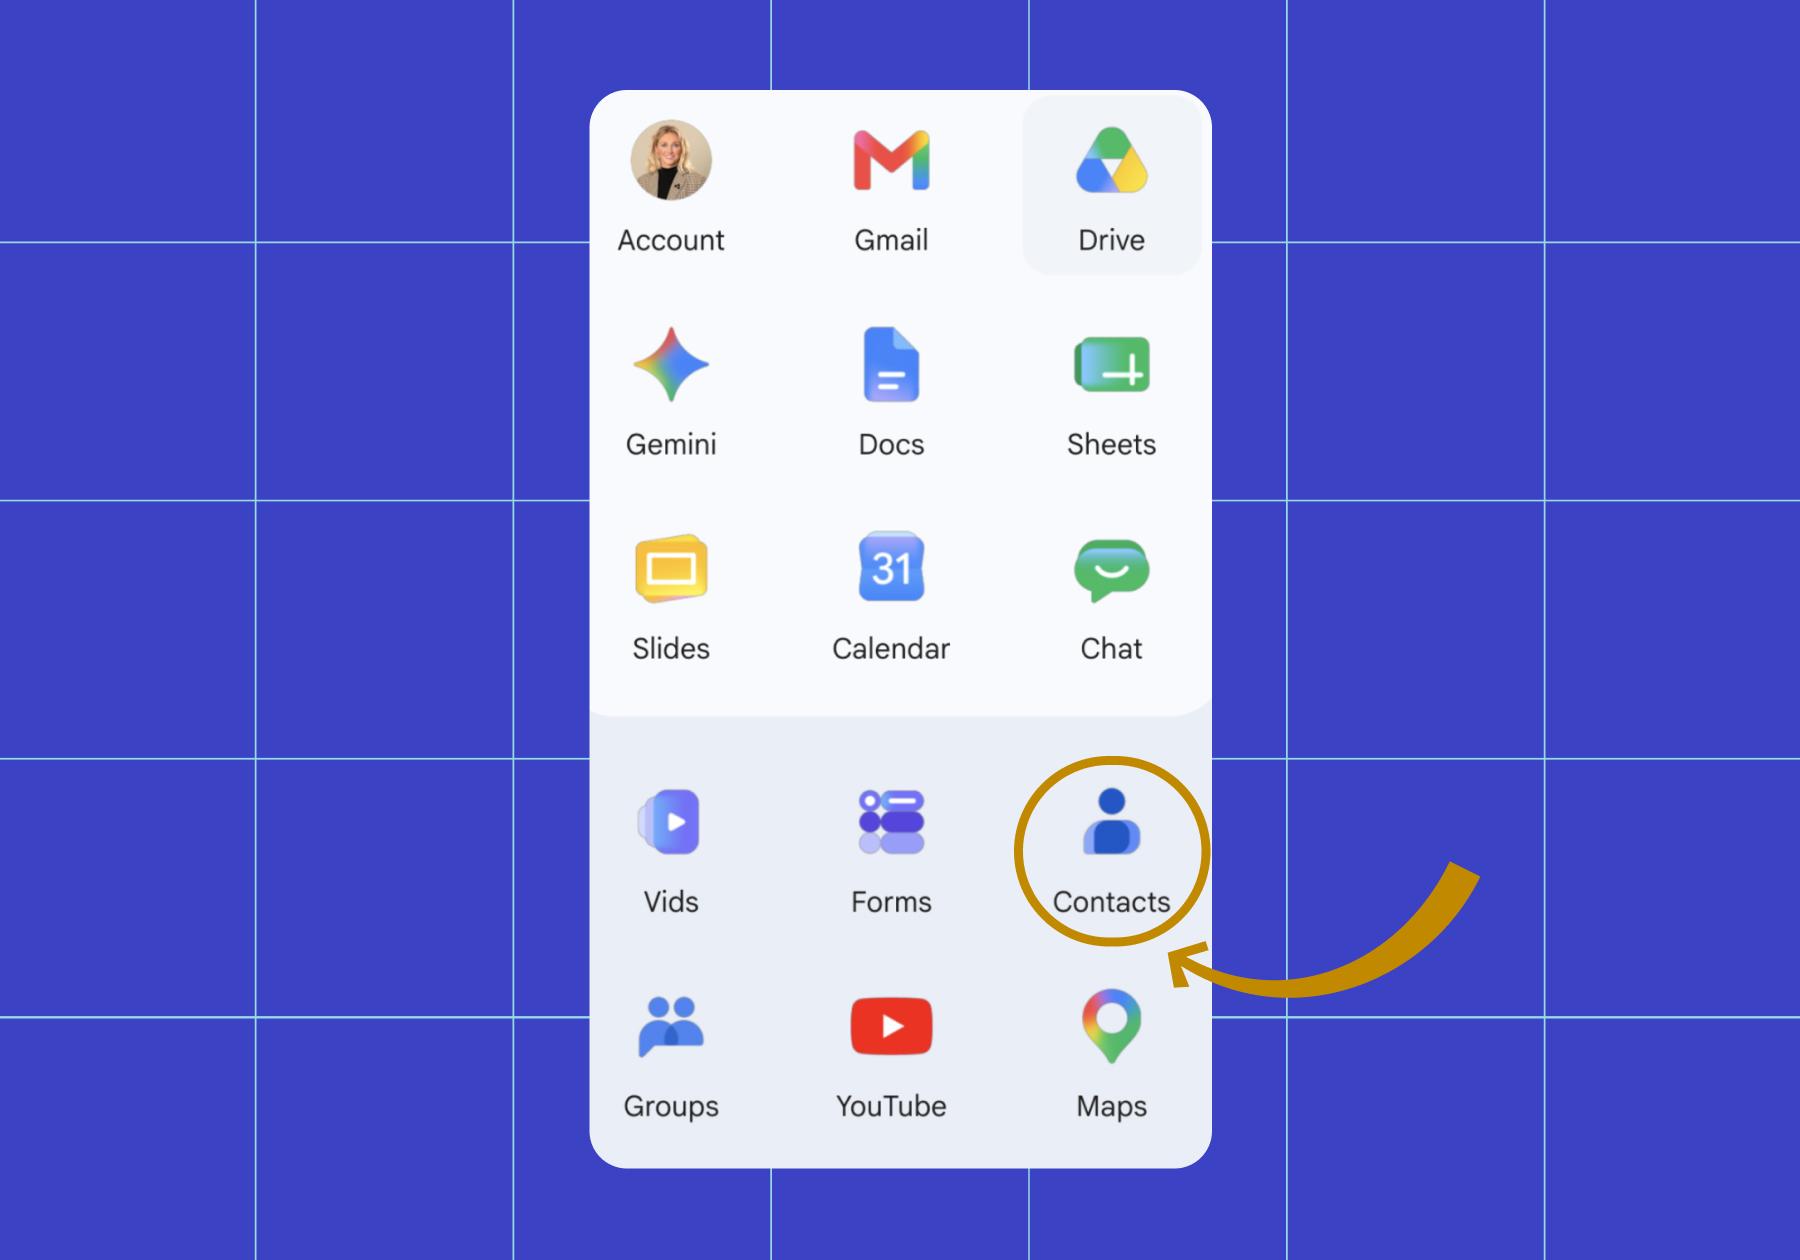
1. Open Google Contacts
You’ll need a free Google account (easy to set up if you don’t have one). Head to Google Contacts; you can also get there by clicking the Google Apps grid icon in the top-right corner of Gmail and selecting “Contacts.”
This is your virtual directory and the starting point for creating email groups.
2. Create a label for your group
On the left side of your screen, you’ll see a Labels section. Click “Create label” and give it a name.
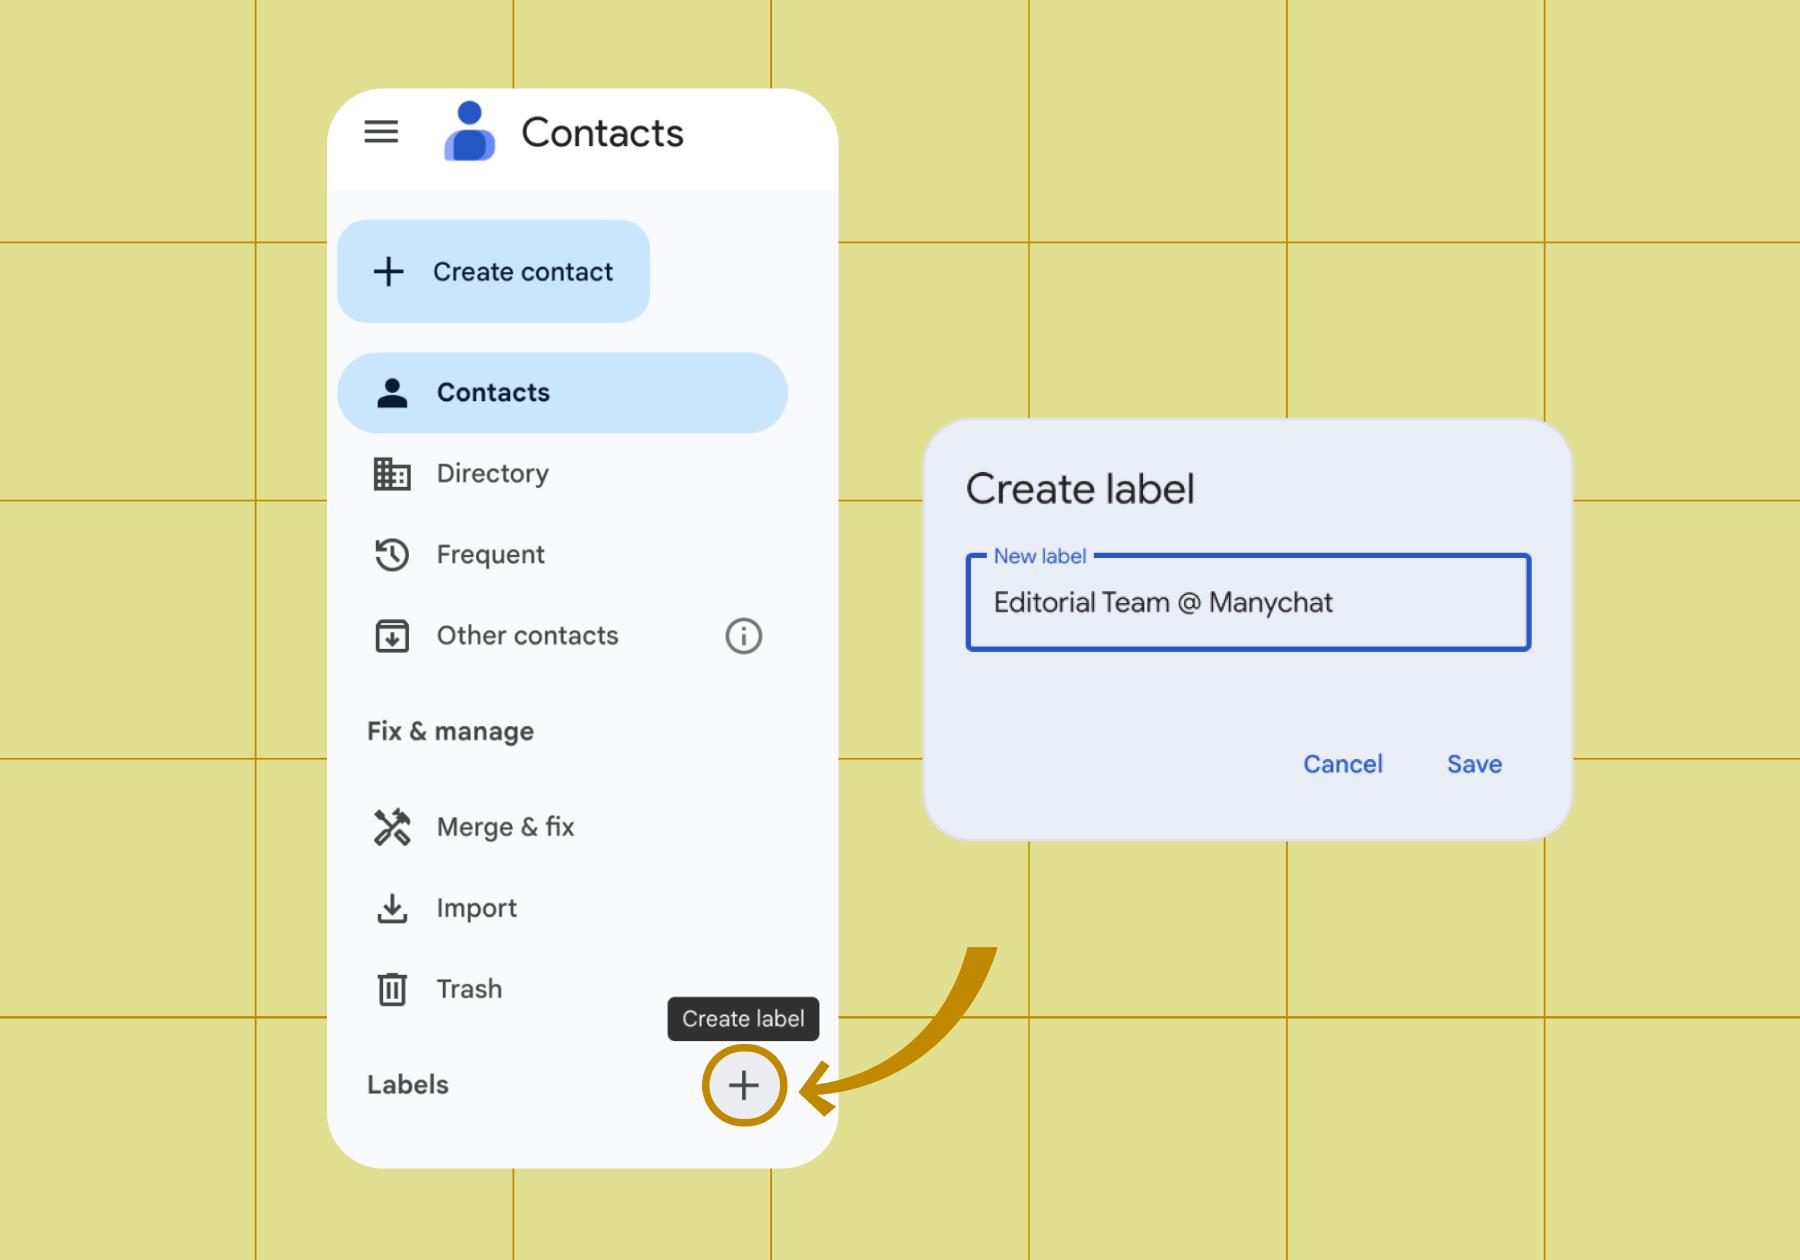
Keep your label names specific and relevant, especially if you plan to create multiple groups.
3. Add contacts to your label
Now add people to your group by creating a contact for each person you want on the list. You’ll have space to enter their first name, last name, company, job title, email address, phone number, and notes.
The most important part (alongside their email address) is the label you assign them. Make sure each new contact gets tagged with the same group label.

Repeat this for every person you want in the group. If you have a lot of contacts to add, you can bulk upload them from a CSV file instead. Google Contacts supports importing contacts directly.
Pro tip: You can also add existing contacts to a label without creating new ones. Just select the contacts you want (check the boxes next to their names), click the “Manage labels” icon at the top, and apply your label.
4. Verify that your group works
Click the label name in the left sidebar of Google Contacts. You should see every contact you’ve added listed under that label. If someone’s missing, select them from your full contacts list and apply the label. A quick check here saves you from sending a group email that accidentally leaves someone out.
Next: Full Send

Your group is set up — now let’s actually use it.
Open Gmail and click “Compose” to start a new email. In the “To” field, type your label name. Gmail will auto-suggest the group, and when you select it, every contact under that label populates as a recipient.
You can also click the word “To” (it’s a clickable link to the left of the address field) to open a contact picker. From there, select “My Contacts,” find your label, and select “Insert Group” to add the whole group at once.

One thing to keep in mind: When you add a group to the “To” field, every recipient can see everyone else’s email address. If privacy matters (say you’re emailing a list of clients who don’t know each other), use BCC instead. Just type the label name into the BCC field, and each person receives the email without seeing the other addresses.
Write your message, craft your subject line, and hit send. That’s it. Your group email will go out to everyone on the label.
How to keep your group emails from getting messy
- Name your labels so you won’t forget what they mean: “Team” is vague. “Q2 Launch — Content Team” is descriptive and specific.
- Clean your lists periodically: People change jobs, email addresses go stale, and bounced emails are annoying. Regular list hygiene is one of the most important email marketing best practices. Every few months, click into your labels and remove contacts that are no longer relevant.
- Use BCC for external groups: If you’re emailing a group of clients, vendors, or collaborators who don’t know each other, always use BCC. Nobody wants their email address shared without permission.
- Know when to graduate to a real tool: Gmail groups are great for small, informal lists. But if you’re sending to more than a few dozen people or need tracking and analytics, it’s time for dedicated email marketing software built for the job.
4 Ways to Actually Put Gmail Groups to Work

Now that you’ve got your first Gmail group set up, here are four ways to actually put it to work.
1. Keep your team in the loop
If you’re running a content team, working with designers and editors, or managing an agency account team, a Gmail group label keeps everyone in the loop. Instead of manually adding people every time you need to share a brief or flag an update, one label handles it. No more “sorry, I forgot to CC you” follow-ups.
2. Wrangle your clients or collaborators
Smart client relationship management starts with organization. You can group all contacts for a specific project or campaign under a single label. Working with four brand partners on a creator collaboration? Label them all under “Spring Campaign Partners,” and send a single email when timelines shift or deliverables change. Everyone stays aligned without you playing telephone.
3. Coordinate vendors and suppliers
Planning a product launch, a creator meetup, or a merch drop? Create a label for everyone involved — your printer, your merch supplier, your venue contact, your photographer. When something changes, one email will keep the whole crew updated.
4. Send business updates without fancy software
Not everyone has the budget for dedicated email marketing tools, and that’s okay. Gmail groups can work as a lightweight way to send product updates, special offers, or announcements to a small list of customers or subscribers.
The honest caveat: You won’t get open rates, click tracking, or any analytics with groups. So, if you’re serious about running email marketing campaigns, a proper tool is worth the investment. But for quick, low-volume updates to a small list? Gmail groups get the job done.
Need to Change Things Later? Here’s How

Need to make changes after the fact? Head back to Google Contacts and click the label you want to manage.
- Rename a label: Hover over the label name in the left sidebar, click the pencil icon (or the three-dot menu), and type in a new name. Your contacts stay attached; only the label name changes.
- Add or remove contacts: Click into the label to see everyone in the group. To remove someone, select their checkbox and click the “Manage labels” icon to uncheck the label. To add someone new, find them in your full contacts list, select them, and apply the label.
- Delete a label entirely: Hover over the label name, click the three-dot menu, and select “Delete label.” Important: Deleting a label doesn’t delete the contacts themselves — it just removes the grouping. Your contacts will stay in Google Contacts.
And don’t forget you can use Manychat to collect email addresses!
Sign up for Manychat and grow that group list faster.
Frequently asked questions
Open Google Contacts, create a new label in the left sidebar, and add contacts to that label. Then, when composing an email in Gmail, type the label name into the “To” field. Gmail will suggest the group, and selecting it adds every contact under that label as a recipient.
Gmail doesn’t store groups in a dedicated folder. Your contact groups live in Google Contacts under the “Labels” section in the left sidebar. To find them, go to contacts.google.com and look for your labels on the left side of the screen.
Go to Google Contacts, click the label you want to change, then hover over the label name and click the pencil icon to rename it. To add or remove contacts, select individual contacts, then use the “Manage labels” icon to apply or remove a label.
A Gmail label group is a personal shortcut in Google Contacts that only you can see and use. A Google Group is a shared mailing list with its own email address (like [email protected]), a collaborative inbox, and member permissions. Most creators and small businesses can get by with the label method.
Google Contacts doesn’t cap the number of contacts you can add to a label, but Gmail limits you to 500 recipients per email in a 24-hour period for regular accounts (2,000 for Google Workspace). If you’re hitting those limits, that’s a sign you need a dedicated email marketing platform.


Originally published: Feb 4, 2021, Updated: Jun 23, 2026