How to Build Your First Chatbot Quiz Using Manychat Conditions
Manychat’s Conditions Feature…
The not-so-secret weapon for deploying a Messenger Marketing chatbot that saves time and offers a great user experience.
Lucky for you, this post will teach you how to utilize conditions, and how to build your first chatbot quiz using this powerful feature!
Conditional logic has a similar effect on your bot to the pill from the movie ‘Limitless’ on your brain (without the side effects). If you don’t use it, your bot is still functioning well but not even close to its potential.
Ready to start building? We’ll get to it, but first you need to understand…
RELATED: 7 Ways to Implement Messenger Marketing into Your Business Today
If/Then Conditional Logic
Fortunately, you’ve been using this kind of logic your entire life.
If you drive to work in the morning, and see a street crossing, you observe the traffic lights and react accordingly—most of the time without being actively aware you’re making the decision.
If there is no traffic light, you look for a street sign and determine your next action accordingly.
You basically make a series of binary (yes/no) decisions. The rank or importance of these decisions may vary though. So, if you see a scampering animal, an old lady in front of your car, or another car stopping short ahead of you, the color of the lights become irrelevant.
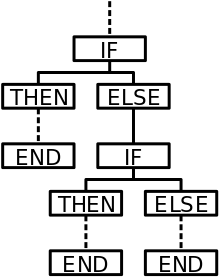
This graph sums up the whole concept, there can be basically limitless options at the end.
This is the exact same way we can make our chatbots more relevant.
Let’s see this in action and take a look at how it makes your life easier while adding extra value to the end user
What’s Possible Now That Wasn’t Before
With this feature, you can always split your audience into two (or more) subgroups according to the information you have about them. This can (and should) take the whole bot experience to a new level.
Before it was impossible to segment out certain users in the bot flow.
You could always use these conditions when sending out a broadcast, so you were able to send messages to only those who were A and B, but not C, for example.
Now you can do it even during the onboarding.
This is how you make your messages highly personalized and utilize the bot’s godlike memory. No need to ask for an email address again and you can also easily make parts of the chatbot exclusive, should you decide so.
Before this update, you had to ‘build your tree’ till the very end of every possible direction.
You had to create separate flows for the answers on every level. Otherwise, it was ‘lost’.
Now you can offer five options in the first question and follow up with a generic question. No need to create five variations for the second question so you can ‘filter’ accordingly later. As the options multiply at every level, this might mean that you only need to work a fraction of the time to finish a questionnaire.
RELATED: How to Send Facebook Messenger Broadcasts Using Manychat (Including Best Practices and Setup!)
Examples, Use Cases, and Using Conditions Based on Initial Values
What is great about Facebook Messenger is that you don’t need to start from scratch to have some information about the user. Facebook provides some information that you can utilize.
My very first chatbot was in German, where I wanted to address people formally, with their family names. Thanks to Facebook, I didn’t need to ask the users to type their names and gender.
Now, I don’t think you want to use the conditional logic for names that much (or being formal in Messenger for that matter). But in that case, it was definitely needed to adjust the greeting according to the gender, Mr. or Ms.
By receiving the language information, you are able to message users in their native tongue by default.
The time zone can come handy when you have the users sign up for a live event, like a webinar. Why not let the bot handle the work of converting time zones? We humans have way better things to do. And we can make mistakes, forget things or just simply don’t feel like doing them.
Do you want to have a special surprise for your users based on when they subscribed? No need to send out several broadcasts. Just send out one and split it with the condition when they click interested.
Manychat does an amazing job at providing information based on how they opted in to your bot. You can utilize that and create different flows, so you don’t offer the same Lead Magnet twice for example.
Now, the fun part — we’re ready to build!
Conditions Based on Information You Collect by Asking
The default options by Facebook and Manychat are nice, but what can really make a difference is the users’ actions. You want to figure out what sort of segments you need to build.
- How do you want to distinguish your users?
- What is important for your business?
- Do you offer different products, services based on their age, location, interests, health condition, income, etc.?
Know what is important to you and go after this information. Of course, you should respect the users’ private space and not overwhelm them with intrusive questions.
If you want to collect a lot of information in a playful and effective way, you can create quizzes inside your bot.
Based on the conditions, you can build out the quiz effectively and show only the relevant results at the end. There are certain industries that are suited more for quizzes, but with a bit of creativity every business can come up with questions that will bring you closer to your customers and help build an engaging relationship with them.
Now before we start to build out a basic quiz, let’s explore what else is possible here.
I already mentioned that you can hide certain parts of the bot with conditions, but an even more exciting feature is the possibility to create whole private memberships in there. For example, everyone who provides his/her email address can access parts unseen by the others.
Gated memberships with chatbots is entirely new playing field to purchases and continuity! You can even match databases for access and extra security.
Everything that can be ‘reused’ should be not asked again. If you need an email address, just ask for it once and let them confirm later on by a button click (if at all). Same goes for addresses, phone numbers or diet preferences etc.
Many things just don’t change often.
Good conversations are based on the context, so make sure your bot is listening. 🙂
Also, make it easy and frictionless for the user every time you can.
- If there was only one order by a user, do you need to ask for the order/tracking number?
- Do you need to ask male users whether they are pregnant?
- If someone is underage, do you need to include questions about alcohol?
In reality, your options are limited only by your resources and creativity here.
Now let’s take a look at a practical example and how to set it up.
Build Your First Chatbot Quiz: Before You Start
If you did your job right, you already have the information that you want to use as a filter.
Should that not be the case, don’t worry. You can always adjust your bot instantly and start collecting information. In some cases, you can also create tags after users already clicked.
So, you want to start building it from the end. What are the end results that you want? It can be really simple, like a split between people with or without an email address or a two-dimensional interest such as weight loss vs mass gain. But it can go as crazy as a 20+ point degree scale.
In our example, we’ll build a quiz for Messenger Marketing and have three final outcomes:
- Beginner
- Intermediate
- Advanced
Here’s how the quiz will be set up:
- Nine questions
- Every correct question is worth 1 point
- Incorrect answers are neither rewarded nor punished
Build Your First Chatbot Quiz: Create The Quiz
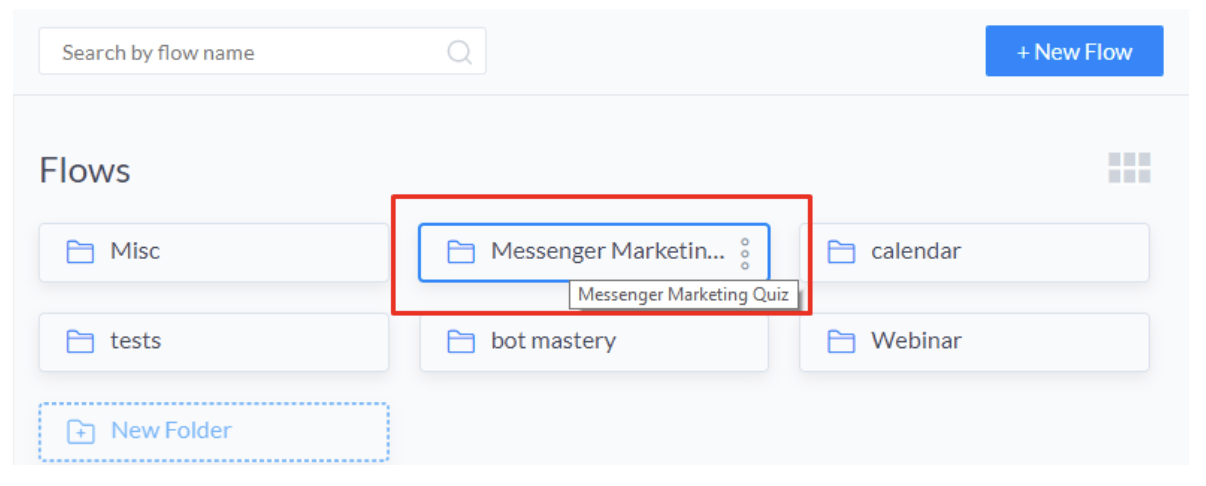
Step 1: Go to the Flows tab and create a new folder to separate messages from other parts of your bot.
Step 2: Create Your Intro Message
It’s a great idea to give a bit of extra information about the quiz like how many questions there will be, what is an expected time commitment, a disclosure or extra info on how to answer the questions.
Remember, based on previous information you can also filter this part out. So if you’ve created a landing page with this information already contained, then you can direct the users straight to the first question.
We are going to create two actions now.
We want to tag those users who have started the quiz, and create a custom field for tracking the score.
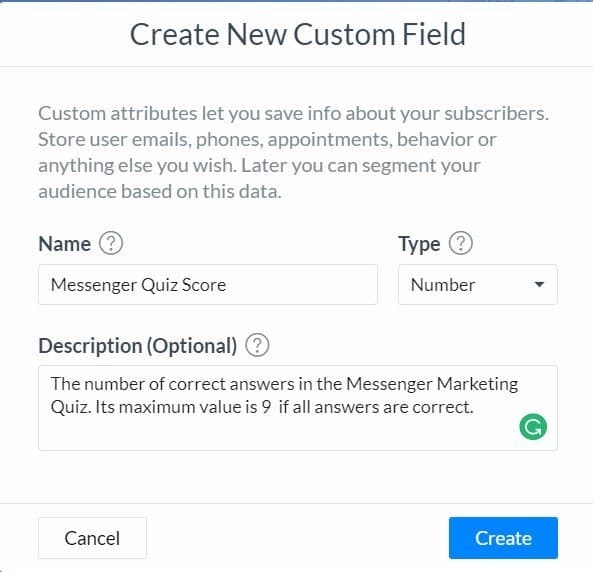
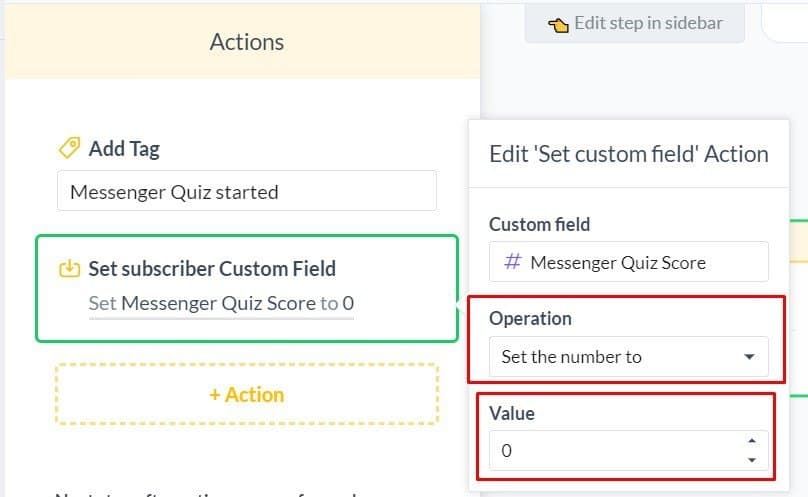
The initial value of the quiz score is set to 0.
The ‘Messenger Quiz started’ tag is not necessary, but gives a basis to further automation.
So our intro flow looks like this in the Visual Builder.
Step 3: Create the 1st Question
Now you need to build out the questions!
In our example, there are two actions happening after every answer before going to the next question.
#1 – Save the Users’ Answers
User Input, Manychat’s first Pro only function is your best friend here. I suggest you give options for the user to choose from (Multiple Choice) when you can. That way you can minimize errors and also keep the quiz light and easy to use.
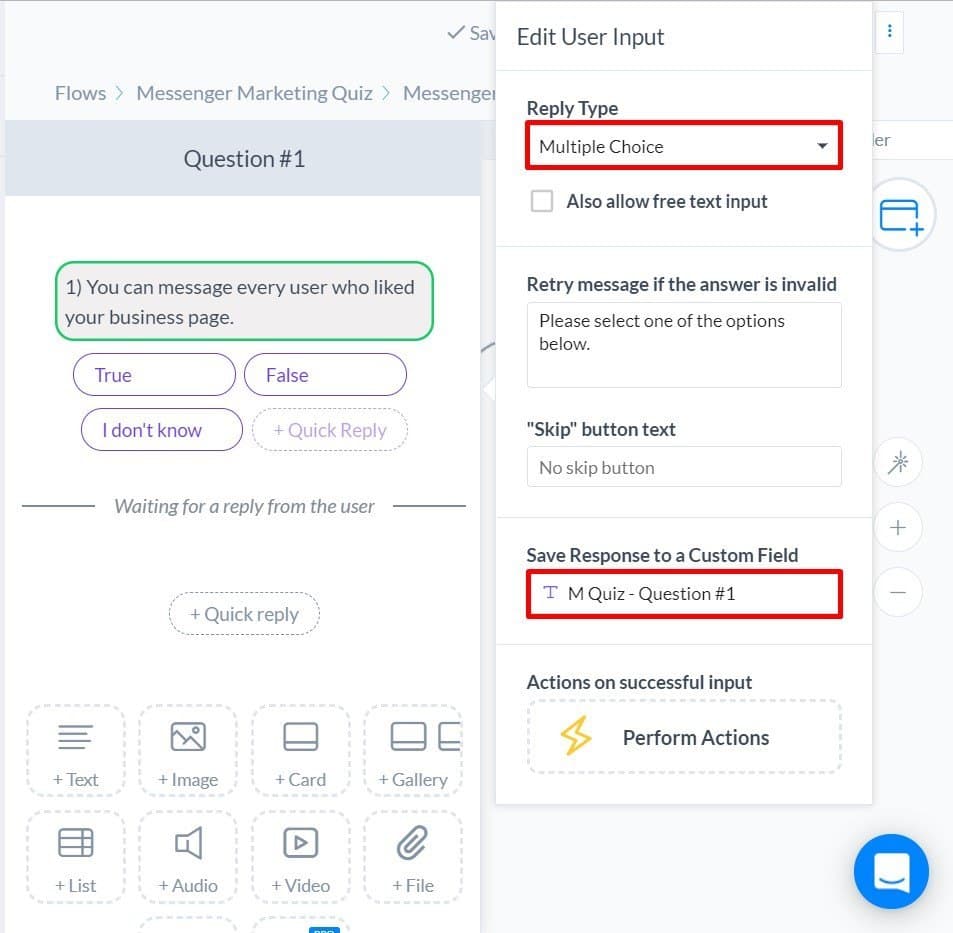
#2 – Is the Answer Correct?
Our favorite if / else condition is the next step.
Create a condition, so you can separate the correct answers. Should there be more correct answers (when typing is enabled), then make sure to set the condition to “any of the following conditions”. If the condition is met:

#3 – Increase the score when the answer was correct.
Every time someone has the correct answer their score should increase.
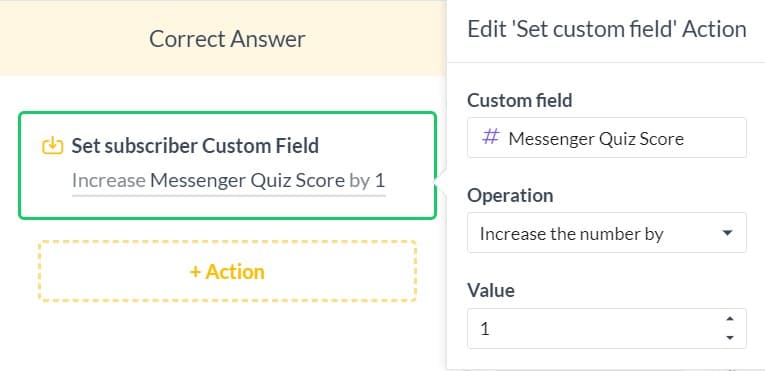
After the increment the 2nd question is due. Users with incorrect answers (condition is not met) will be directed straight to the next question.
So our ‘question template’ looks like this.
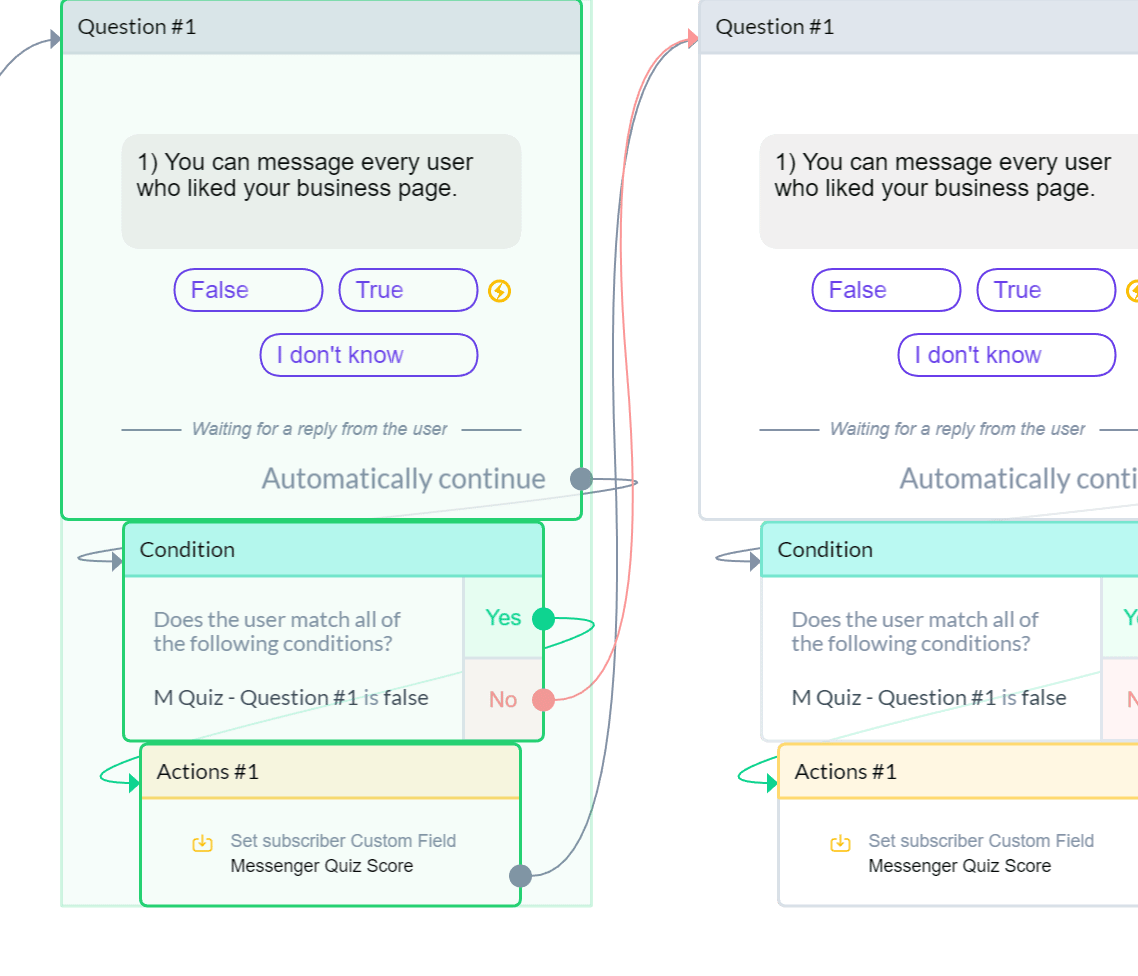
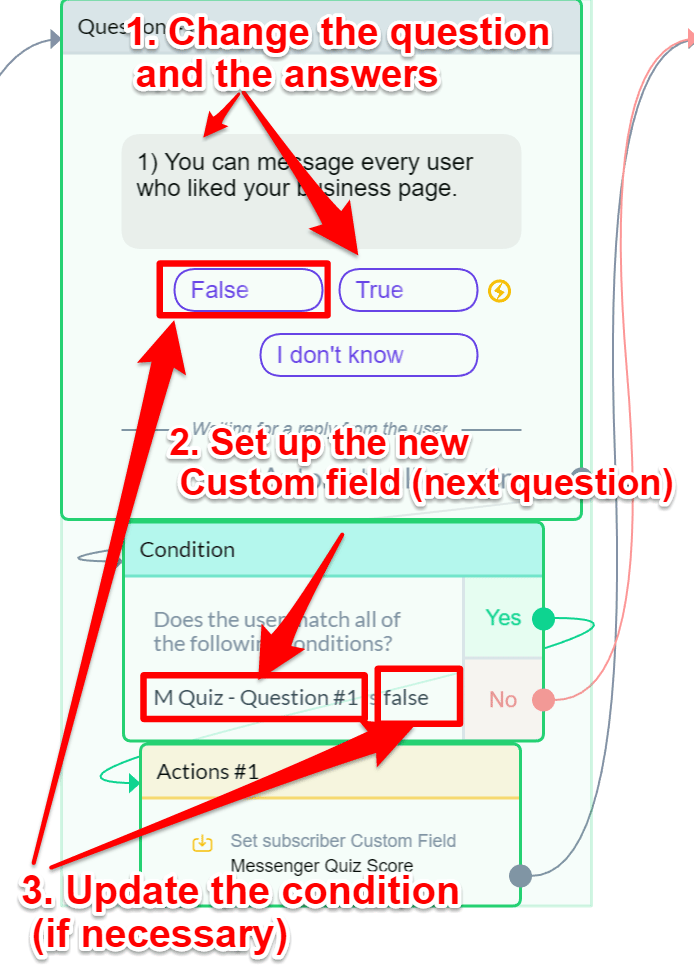
Step 4: Finish all your questions by duplicating the ‘template’.
Fortunately, you don’t have to start from scratch for every question!
The ‘correct answer’ action step stays always the same (increase score), and you might be able to reuse the answers of the previous question if you have a similar structure.
Don’t forget to update the custom field and make sure that the condition is right!
Step 5: Create the ‘Result Messages’
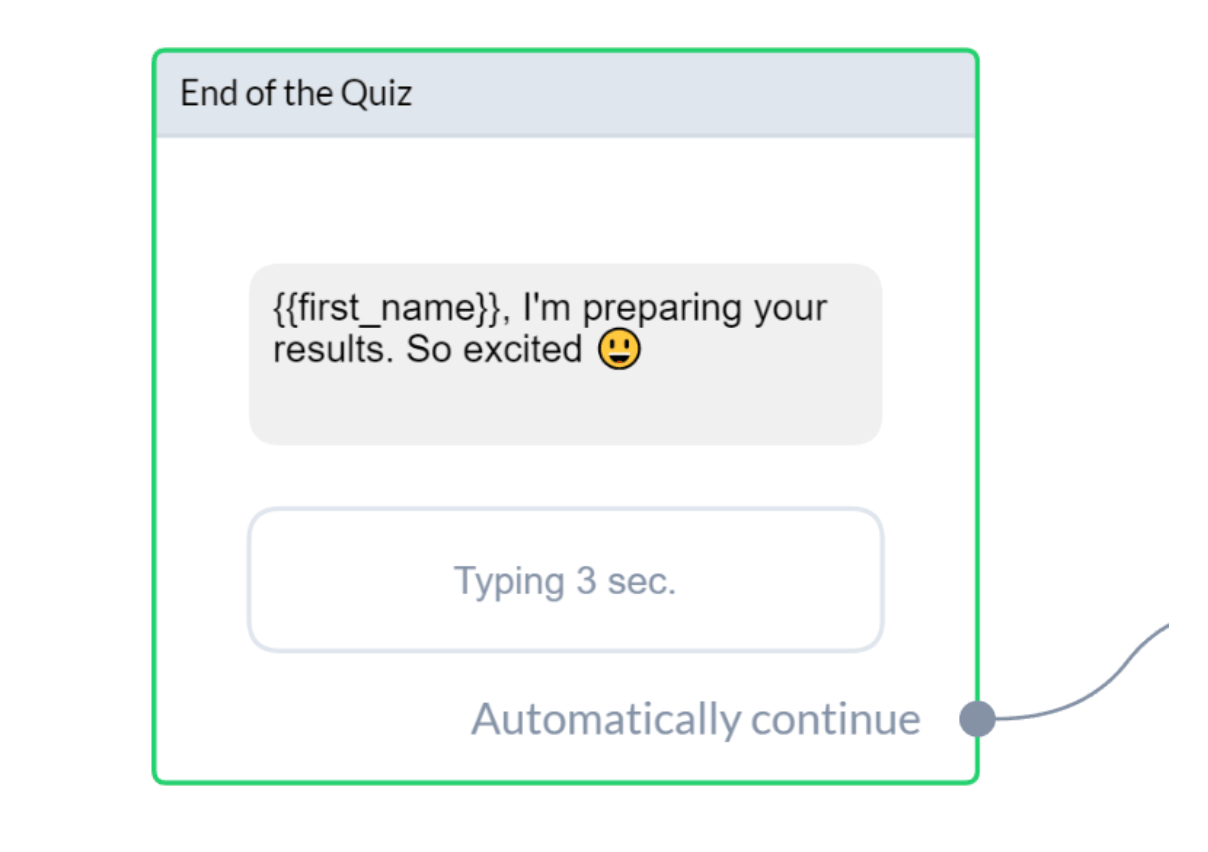
Although, you could just provide the results straight after the last message, it’s a great occasion to add some delay between the messages.
The user attention and excitement is probably the highest at this point. But besides being a little tease, this also makes the whole quiz a bit more trustworthy as it ‘needs time to calculate the results’.
But you don’t want to wait too long either, 3-5 seconds is plenty.
Also, you might want to tag the users who have finished the quiz, so you can use the start and finish tag to create segments.
Then it is time to deliver the results.
In our case, we want to create three subsections, so one condition is not enough. Every condition creates only two sections (yes/no).
So we need two conditions.
Our 1st condition is filtering out the ones with a score of 3 or less. So if this condition is met, the user goes to the beginner step. If the score is higher than 3, we need to determine if the result brings him/her to the intermediate or advanced message.
That job is done by the 2nd condition (Score=6 or lower).
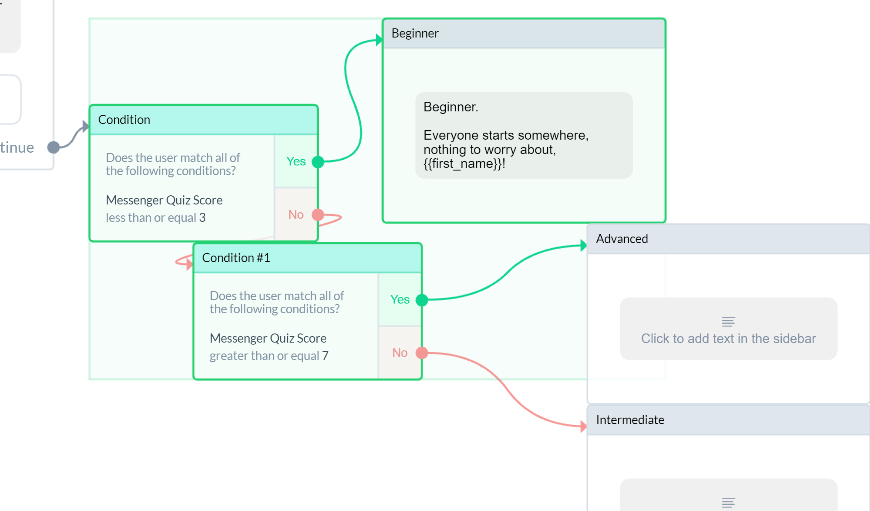
When you have the results by the conditions, all you need to do is write your final messages for the results. In our case, beginner, intermediate and advanced.
You can add a final CTA, or ask for their email addresses in exchange for results etc.
Build Your First Chatbot Quiz: Test
At this stage, test your bot.
Don’t skip this, mistakes can break the whole experience. You can always monitor (and adjust if needed) your tags and custom fields from the audience tab when you filter for your name.
Tip: also create a tag ‘test’ and add people from your team for quick feedback.
Build Your First Chatbot Quiz: Publish
If the test is correct, make sure to publish the flows and add the quiz to your existing menu or onboarding. Don’t forget to notify the existing users about the update!
Also, you can create growth tools only for the quiz part of the bot.
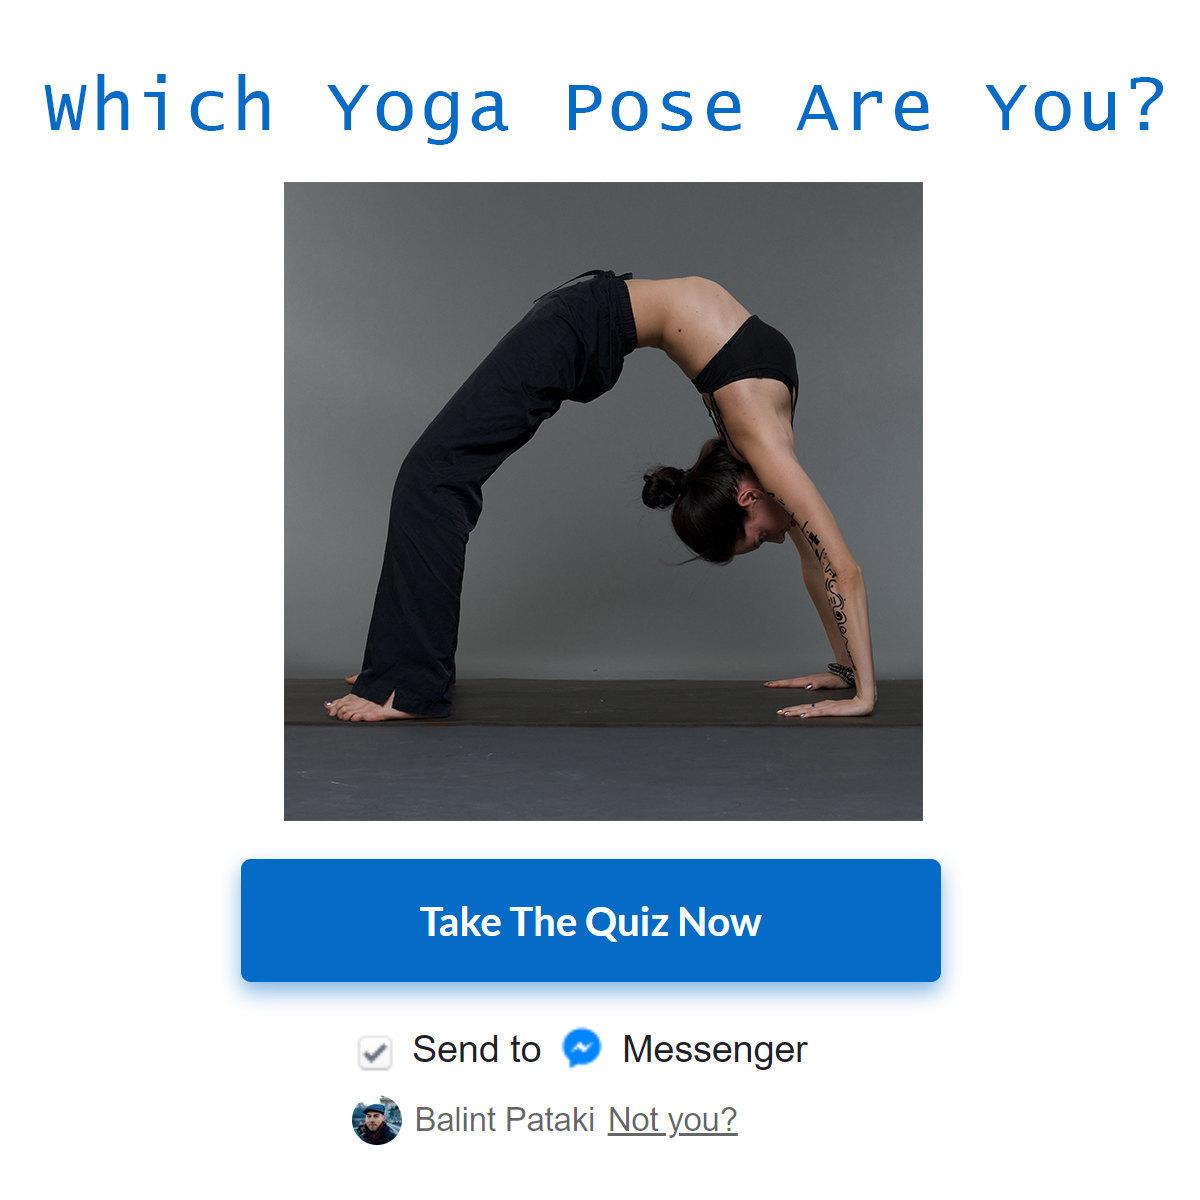
Here is the link/button to this exact quiz, we’re curious how you’re doing, let us know your score in the comments ?
Take the Messenger Quiz now.
3 Quick Ways to Create Your Quiz Content
Quizzes provide a fun and entertaining way of learning about several topics. Creating quizzes or trivia questions can be a fun, yet, challenging task.
The following are three quick ways to create quiz contents that are creative and full of facts.
Choose the Topic for Your Audience
When creating quiz content, ensure that you choose an interesting topic your target group is interested in.
Don’t forget, it’s not an interrogation or data collection for your business’ purposes. People want to know more about themselves in a fun way. Give them that and they’ll remember you (plus subscribe to your list). Do a little bit of brainstorming, what is related to your business, don’t be afraid to think outside of the box here, you’re just collecting ideas.
Also, why not ask your customers? Never underestimate people’s willingness to help others if the need is coming from a value giving perspective!
Use Creative Titles and Cohesive Designs
One thing that will make your quiz distinct, yet, awesome is using creative titles and cohesive designs.
They will help give the quiz the professionalism and cohesion it deserves. By making use of an eye-catching design, you can catch all the attention of the participants.
This might be all you need to make the quiz go viral. You can use the image on many platforms (yes, including Messenger).
Create Fun and Comprehensive Questions
Compose engaging and well-written questions.
This will help raise the excitement level of your audience, while they anticipate the next set of questions. Make each question unique and make sure that the questions can only be interpreted one way.
Provide funny answers if that is the tone of the quiz 🙂
However, it is important that you keep the questions short, precise, and based on facts. Above all, vary the level of difficulty of the questions. This will make answering the questions more fun!
Don’t forget that you can always monitor the answers and adjust your quiz very quickly. Just create a version and ask for feedback from a small subset of your customers/fans.
Perfection is your enemy here.
RELATED: Messenger Marketing + Compliance: What You Need to Know About Engagement Bait and Facebook ToS
Messenger bots fit naturally well with quizzes because it is normal and easy to answer questions inside. You can not only take the information from Facebook or previous interactions but also use it anytime later throughout the customer journey.
It’s not just an email address and a generic result!
If you advertise on Facebook, you can build a frictionless experience for the users they haven’t seen before. First, you introduce them to an idea, then offer the quiz followed by a CTA resulting in a booked and paid appointment. All this inside of Messenger.
There are some great cases for building quizzes but do not worry if you don’t want to use them.
Just keep in mind that you can customize your flows and even create exclusive content inside your bot with the power of conditions.
READ NEXT: The Ultimate Guide To Messenger Marketing and Facebook Chatbots
General Action Steps to Conditions
- Figure out your desired ‘end results’ i.e. segments
- Determine the type of data you need (text, number, Boolean or date)
- Figure out how you can use more filters together. Remember, you can always subdivide the remaining group if you did the previous parts correctly. Also, variables are not of equal importance.
- Ask and save the answers accordingly
- Set up the conditions
- Test and refine. Also let the users tell you how much they enjoyed the experience 😉
Don’t forget—let us know in the comments how you did on the Messenger quiz. It has some advanced questions, so no need to be shy ☺!
A great place to expand your knowledge about chatbots and Messenger marketing is my podcast. Here is an episode where Mikael shares his knowledge of Messenger Marketing.

Balint Pataki is the founder of Chatbottutorial.com and the host of The Chatbot Podcast. During his studies in Austria and Portugal, he gained massive interest in technological marketing and started working in online advertising before his graduation. When Facebook introduced Messenger as an ad destination in the fall of 2016, he immediately jumped on the opportunity and has been building Messenger bots ever since. Besides helping businesses with Messenger marketing and automation, he also runs a mastermind where he shares his knowledge of chatbot building and marketing.

Originally published: Feb 22, 2018