


Did you know you can integrate Shopify to Manychat? It’s an amazingly powerful integration, but how can you make the most of that partnership? One way is to ensure a frictionless, fast checkout experience at your Shopify store. After all, once a user gets to that point in the funnel, you certainly don’t want them to leave without purchasing. The best way to achieve a great integration between Manychat and Shopify is to use third parties like Make and Zapier.
This article will look at the current state of eCommerce checkout experiences, metrics to measure success, and tips for creating a seamless checkout experience.
The current state of eCommerce checkout experiences
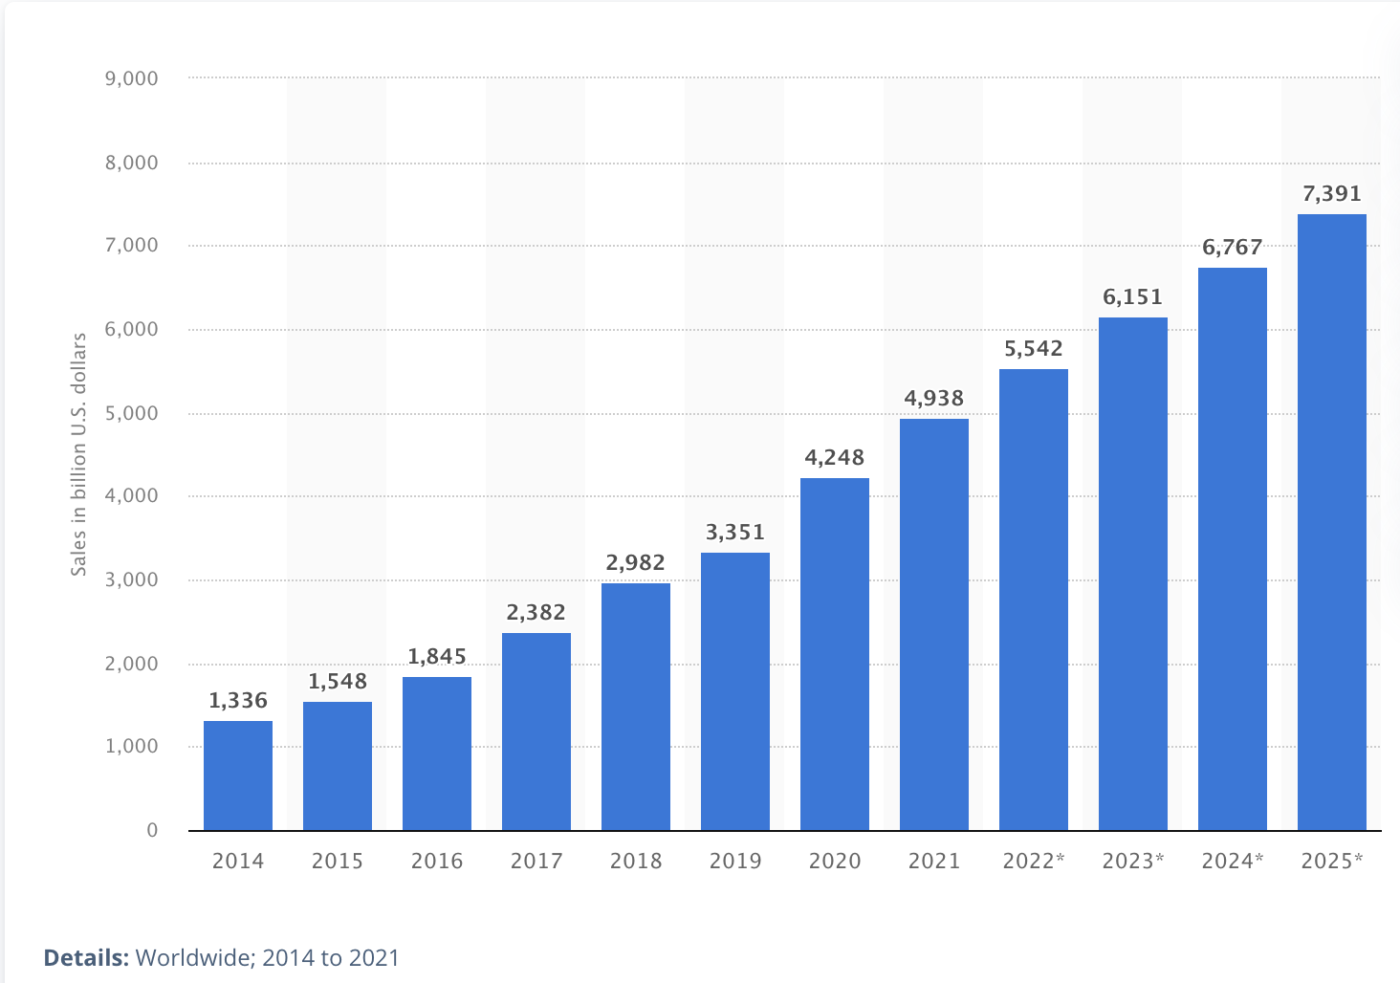
Ecommerce sales have been steadily increasing year-over-year. In 2022, eCommerce sales will be a massive 21% of global retail sales.
As more consumers turn to eCommerce and become comfortable with the digital checkout experience, they begin to form expectations. Here are top expectations customers have for digital shopping platforms:
- Innovative technology: Customers can expect established brands to use new, secure technology to complete the checkout process.
- Speed: The ability to save your payment information and delivery address facilitates expedient checkout.
- Convenience: Offering multiple payment options makes it easy for customers who have a preferred method.
We’ll explore these checkout features throughout the article.
What does checkout performance mean for a Shopify store?
As a brand, you may be looking at the data associated with your digital checkout to determine its performance. What do all of the metrics tell you about your checkout experience?
Cart abandonment rate
Cart abandonment rate (CAR) is the percentage of users who’ve added items to their cart but didn’t complete the checkout. Calculate your CAR using this formula: # of carts – # of orders / # of carts.
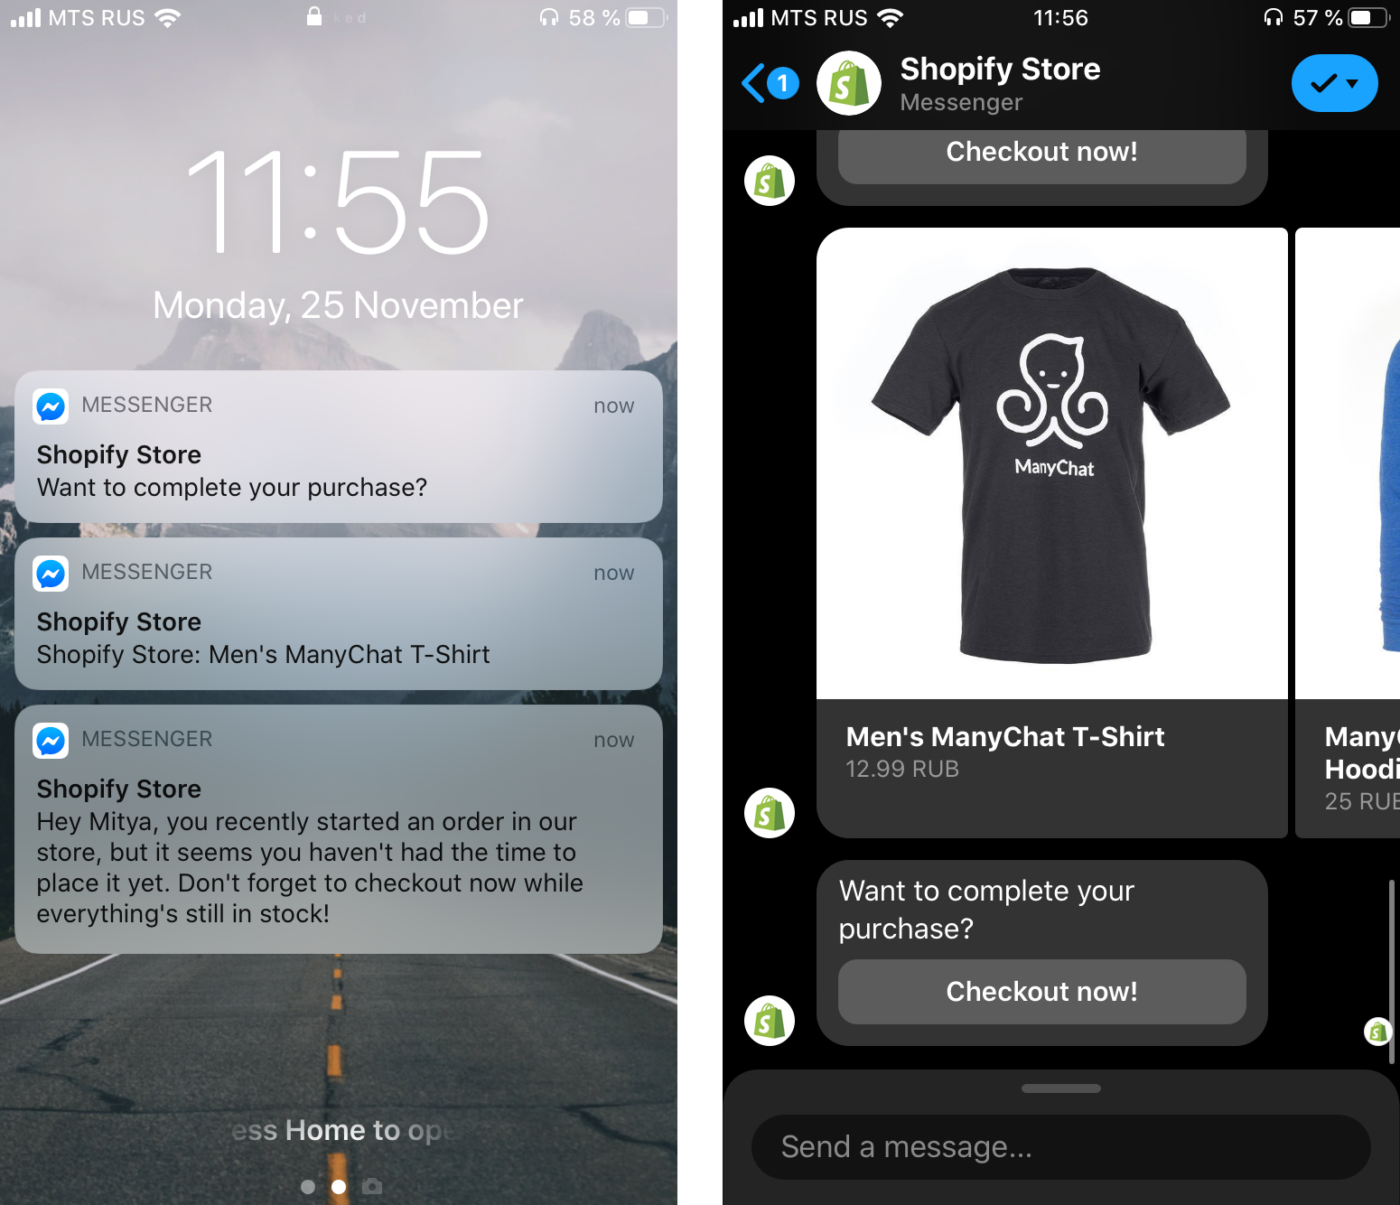
A high CAR could result from a complicated checkout process, lack of payment options, an increased shipping cost, or a host of other possibilities. Try sending an email or a text to users reminding them they have items in their cart to capture their sales.
Checkout engagement rate
The percentage of customers who begin the checkout page once they visit their cart is referred to as the checkout engagement rate (CER). The CER is another way of looking at the CAR because it helps you evaluate how effective your cart page is.
Calculate your CER using this formula: # of sessions that began checkout / # of visits that included the cart page.
Checkout conversion rate
Figure out the percentage of shoppers who complete the checkout process from start to finish to get your checkout conversion rate (CCR). These are the customers who complete a checkout without moving back and forth between website pages.
Calculate your CCR using this formula: # of sessions that completed checkout / # of sessions that began checkout.
Accelerated checkout rate
The accelerated checkout rate (ACR) is the number of customers who complete payment using a particular payment option compared to all completed transactions.
Calculate your ACR using this formula: # number of transactions with digital payments / # of all transactions.
Mobile abandonment gap
The mobile abandonment gap (MAG) shows the differences between the CAR for mobile devices and the CAR on a desktop computer. As people become more and more comfortable purchasing on their phones, an appealing mobile experience becomes more critical.
Calculate your MAG using this formula: mobile CAR – desktop CAR.
How to reduce friction and speed up eCommerce checkout
Convenience and complexity are big factors that influence whether people complete the checkout process. Follow these tips for reducing friction so customers don’t abandon their carts:
Optimize for global shopping
International shoppers need to see sites with options for their preferred language, currency, and payment options. Utilizing Shopify Plus is an easy way to optimize, as it allows for 130+ currencies, 20 languages, and various payment methods.
Reduce the number of form fields
If a potential customer has to fill out a lengthy form to buy something, they’ll have more time to change their mind and buy from another brand. In general, the fewer questions the better, but the average eCommerce form has six to eight fields.
Gain users’ trust
A user will abandon a full cart if they don’t feel comfortable entering their personal and payment method information. You can communicate that your Shopify store is secure by displaying credit card logos, authenticity badges, and a link to your privacy policy.
Save customer information for autofill
Google AutoFill can help create a frictionless checkout since it saves customers from having to enter their information manually. Shopify also enables Shop Pay, an accelerated checkout that allows customers to save their email address, credit card, and shipping and billing information. (This also adds Shop Pay installments as a payment method option.)
Nine best practices for Shopify checkout page customization
Now that you’ve got the basics, let’s look at some tips for creating a custom Shopify checkout page.
Allow guest checkout
In other words, don’t force new customers to create an account. Doing so could drive them away for good! Allow customers to log in with Google, Instagram, or Facebook and make a quick purchase.
Here’s how to enable guest checkout for your Shopify store:
- In the admin dashboard, go to Settings > Checkouts.
- Under customer accounts, choose Accounts are optional.
- Select Enable Multipass for multiple pass login.
- Click Confirm.
Create a Shopify one-page checkout
One-page checkout helps people complete the process faster. Shopify’s one-page checkout can include shipping, delivery, and payment method information on a single page, which reduces the number of individual steps a customer has to navigate through to complete a purchase.
Show cart security messages
Shopify already displays the “All transactions are secure and encrypted” message above the credit card field, but you can customize it to fit your online store.
Change the Shopify default cart message by:
- Searching for “All transactions are secure and encrypted” and look for Card security notice under Checkout & system/Checkout payment.
- Updating the existing message with yours and saving your changes.
Offer several payment options
Shopify highly recommendeds allowing for multiple payment solutions to accommodate for customers’ preferred method (such as American Express, Google Pay, or Amazon Pay).
Here’s how to add more payment options to your Shopify checkout page:
- Go to Settings > Payments from your admin.
- In the Alternative Payments section, click Choose alternative payment.
- Choose a provider from the list.
- Enter your account credentials for that provider.
- Click Activate to enable the provider.
Upsell on the Shopify checkout page
Showing similar (but higher-priced) or complementary products on the checkout page is an excellent tactic for upselling. Once you add the product recommendations to that page, make sure it’s easy to add them to the cart.
Promote a sense of urgency
Flash sales that only last for a few hours can generate a “fear of missing out” anxiety and increase sales. You could also add a timer to your cart page, especially for sale items. Here are some other ways to create urgency:
- If there are only a few of a particular item left, indicate that stocks are low
- Provide a limited-time discount along with free shipping
- Attach a gift or free voucher with an expiration date for any customer returning to your store
Add a date picker for easy tracking and delivery
Adding a date picker helps buyers track their orders. You can also provide more options on shipping and pickup options.
Communicate your refund policy
Displaying your refund policy carries a lot of weight in boosting credibility and building trust with your valued consumers. Your refund policy must cover every scenario, including refund conditions, a warranty, a warranty period, and a return window.
Here’s how to display a store policy on the Shopify checkout page:
- From the admin dashboard, head to Settings > Legal.
- Fill in your policy or choose a pre-made template.
- Edit and add links per your needs, then click Save to confirm your settings.
Keep pricing transparent
No customer will be happy if they encounter hidden costs (such as a transaction fee) in the checkout process. Transparent pricing will help you gain buyers’ trust.
Showcase the breakdown of your customers’ payments as clearly as possible, including the price of items, shipping cost, taxes, and even the price after discounts (if applicable).
Several factors play into a seamless eCommerce checkout experience, but Shopify has tools to help. Try a few of the tips from this article and start calculating your metrics—you’re sure to see your checkout sales increase!
Ready to try the Shopify integration with ManyChat?
