Big news, everyone:
You’re finally able to receive money in Facebook with ManyChat Messenger Payments!
This is a major announcement for Facebook messenger users, and we know a lot of you have been waiting for this one. So pop the champagne, do a little dance, call your mom—whatever you gotta do. Get it all out of your system!
But when you’re done, keep reading—because in this post you’re going to learn how this new payment method works and how to set them up in your ManyChat Pro account.
First, here’s a quick example of how these Facebook mobile payment will look from the user’s end:
Pretty slick, right?
Just click “Buy” and enter your credit card info to share payment information. It’s about as easy as it gets.
Quick enough for impulse purchases, robust enough for fully fleshed-out sales funnels.
Let’s dive in and see how you can set up ManyChat payments inside your account.
(Spoiler alert: it’s pretty easy).
Table of contents:
- Benefits of accepting Facebook Messenger app payments
- How to set up Facebook Messenger payments
- How to create a “Buy” button in a Messenger conversation
- Facebook Payments for ManyChat Q&A
- Facebook Messenger Payment Updates from ManyChat
- What you can do with Messenger Payments in ManyChat
Benefits of accepting Facebook Messenger app payments
What are the benefits of taking Facebook Messenger payments? Consider that the rise in mobile payments is set to continue with an annual growth rate of 26% between 2020 and 2025, according to Mordor Intelligence.
And online retailers use mobile payment methods in ManyChat because:
- Since they are considered in-app payments, your customers don’t have to leave Messenger to buy from you. Less friction + a more streamlined Facebook payment checkout process = higher conversion rates.
- It’s perfect for conversational selling. Thanks to the interactive nature of Messenger Marketing, you’ll be able to ask all the relevant questions and offer your users the product that’s best suited to their needs.
- Major trust factor. People trust Facebook/Messenger app, so questions of credit or debit card payment information will be a thing of the past.
- The possibilities for scalable marketing automation are endless! Sell products directly inside your automated Messenger sequences. Turn your chat/Messenger bot into your company’s best 24/7 salesperson.
- Since everything happens in Messenger, there’s no need to set up third-party or cross-domain tracking. Implementation of Facebook messenger payment is simple & easy
How to set up Facebook Messenger payments in ManyChat
You can set up two payment providers to accept payments in your ManyChat bot: PayPal and Stripe.
PayPal
Here’s how to set up ManyChat’s PayPal integration.
1. Create a PayPal business account
Go to PayPal and log into your business account. If you don’t have a PayPal Business Account, create one.
2. Create an App in your PayPal Developer account
Log into your business account and type https://developer.paypal.com. Click Log into Dashboard.
Click My Apps & Credentials in the Dashboard tab of your Facebook account. Then click Create App.
The App has two modes:
- Sandbox mode (for testing)
- Live mode (for real transactions)
In the App, set up a Webhooks and transfer the information to ManyChat Client_ID for Preview mode and real payments.
Note: If you want to test your PayPal button, you’ll need to create a separate app in the Sandbox mode
3. Create a webhook
Click the Add Webhook button in the app.
Create a Webhook with the following information:
Webhook Url = https://manychat.com/paypalwh/webhook/%PAGE_ID%
Event types = All event types
To find your PAGE_ID, open your ManyChat account. Choose the account you want to connect with PayPal.
Find the PAGE_ID in the address bar of your browser. The PAGE_ID for this example is: 2295540894097018
This Webhook example was created for Sandbox mode.
To create a Live Webhook, switch the app state from Sandbox to Live. Then repeat the above process.
See the video below to watch a live setup.
4. Send information to ManyChat
Now that you’ve created the Client ID, transfer the information to ManyChat with the following steps:
- Open your App and click the “Sandbox” tab.
- Copy Client_ID from PayPal from your Sandbox API Credentials.
- Under Payments tab in your ManyChat account, add the copied Client ID to the Enter Sandbox Client ID field.
- Go back to your Paypal account. Click the Live tab. Then copy the Client_ID from your Live API Credentials.
- Paste that information in the Live Client ID field in your ManyChat dashboard.
5. Connect your Paypal account
Once you enter the Client ID’s, click Connect PayPal Account.
And that’s all! You can now add a Paypal Buy Button to your flows.
Stripe
To get started, open the “Settings” section in any ManyChat Pro account and click the “Payments” tab.
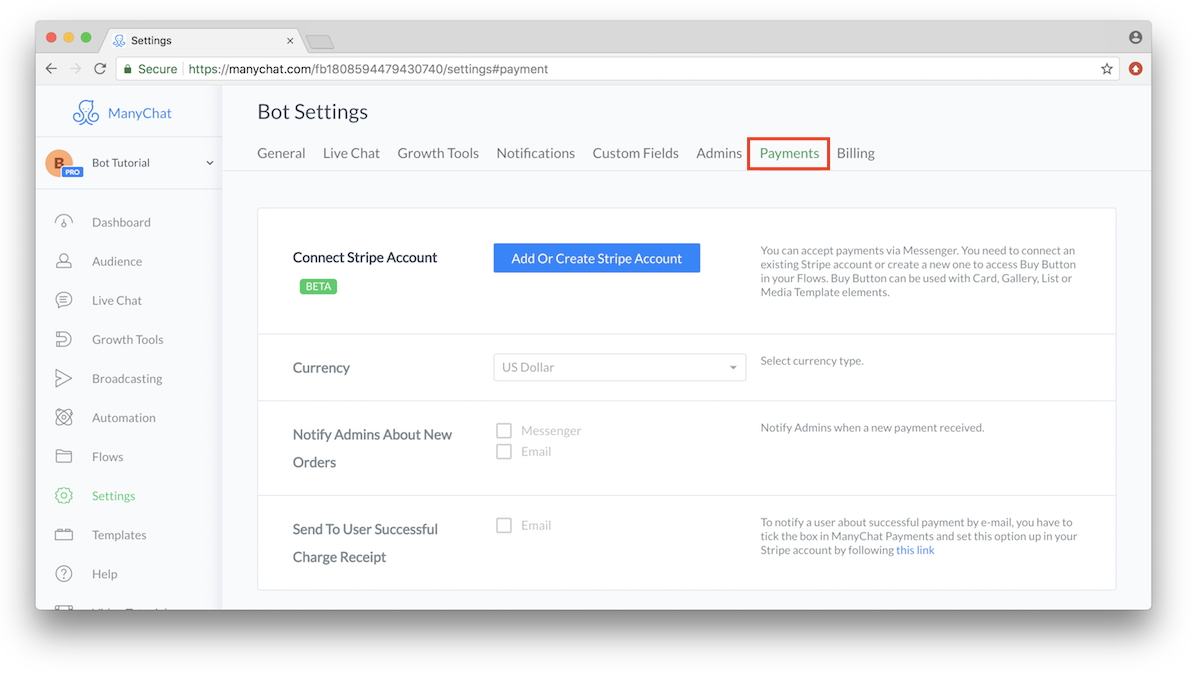
Here you can:
- Connect to a Stripe account that is linked to a bank account or credit card
- Change your currency type
- Update your notification settings for new orders
- See your entire order history
To get started, click the “Add or Create Stripe Account” button. You’ll be taken to the Stripe login page:
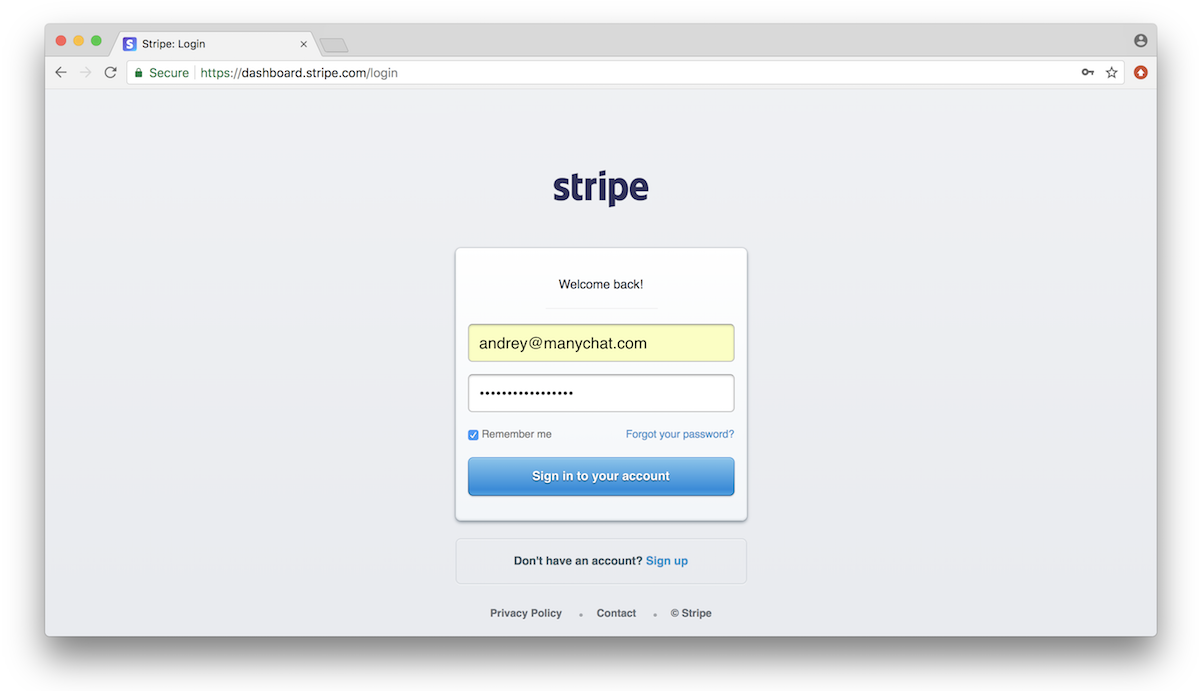
In order to connect ManyChat to Stripe, you’ll need to be an admin for both services. Otherwise you’ll get an error message and won’t be able to proceed.
If you’re connecting an existing Stripe account, this should be quick and easy. Just connect the two services and you can begin accepting mobile payments right away!
If you’re creating a new Stripe account, you’ll need to add some additional info about your business. But the process is still pretty straightforward.
Once the Stripe payment platform is connected to ManyChat, you’ll be able to add a “Buy” button to your ManyChat flows.
[RELATED: Messenger Marketing + Compliance: What You Need to Know About Engagement Bait and Facebook ToS]
How to create a “Buy” button in a Messenger conversation
There’s a new button type in ManyChat: the buy button. And accepting payments from Facebook messenger users is as simple as adding this button and configuring it for the product or service you’re selling.
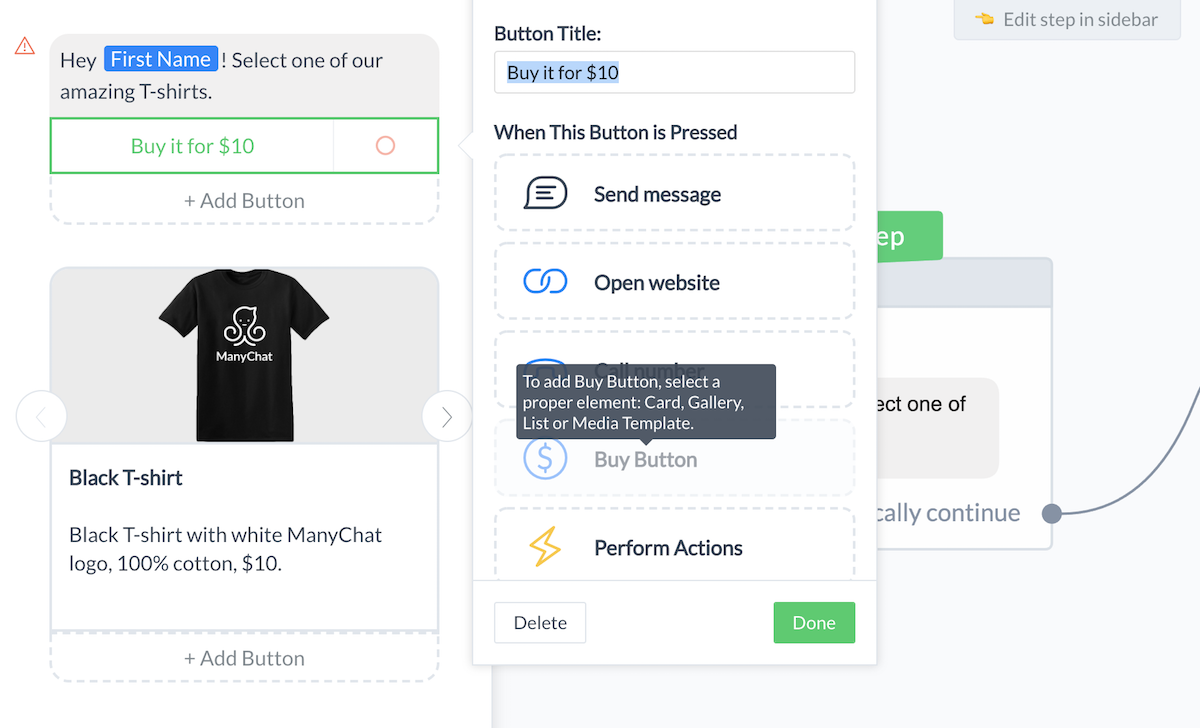
To get started, just click “Buy Button” when you reach this screen. Keep in mind that this button can be added only to Card, Gallery, List, and Media Template elements:
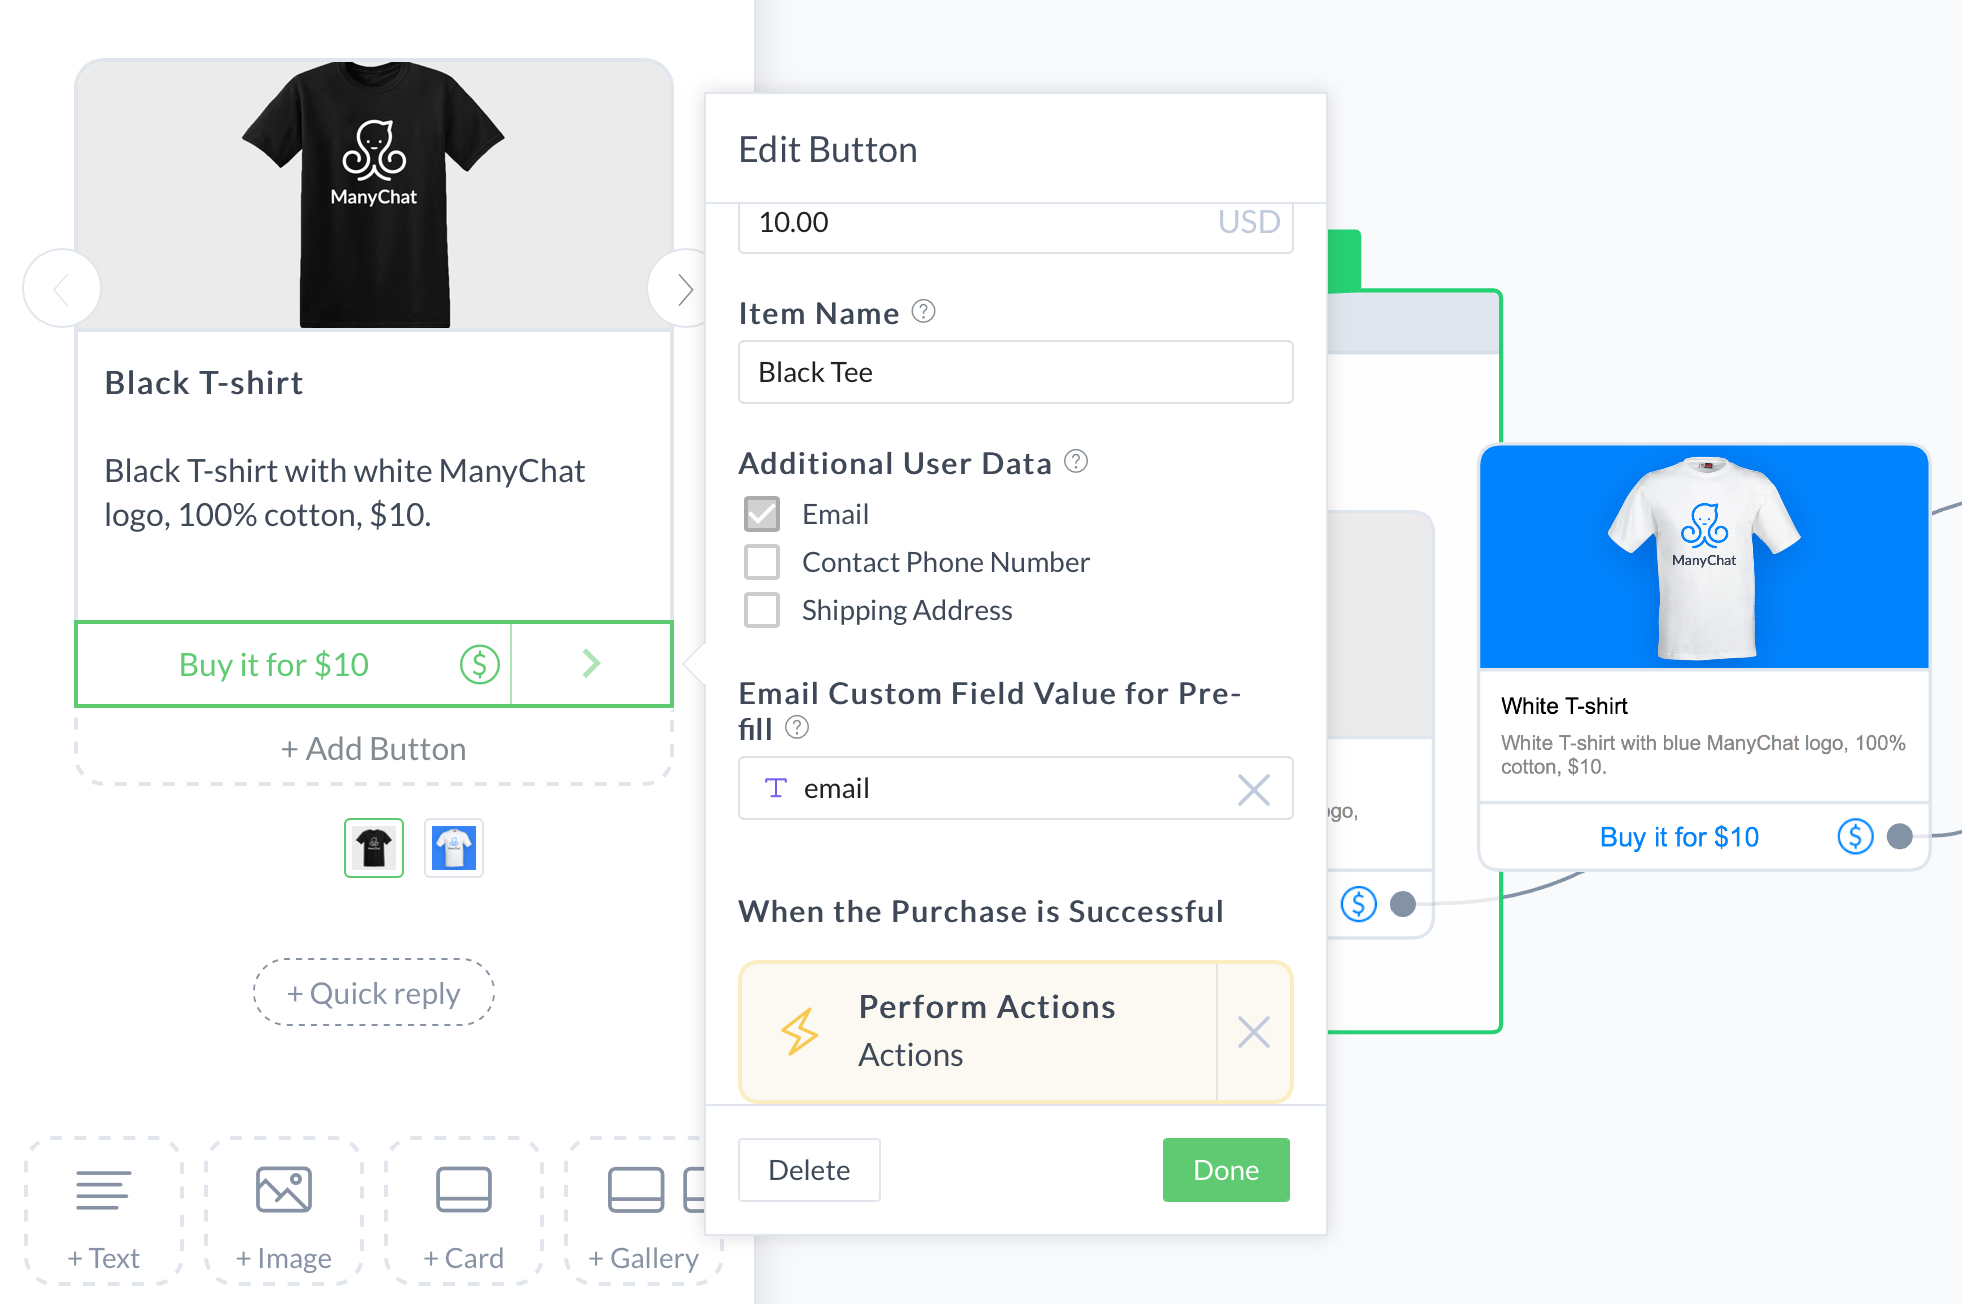
Next you’ll see a screen like this, where you can add some more information about the product you’re selling:
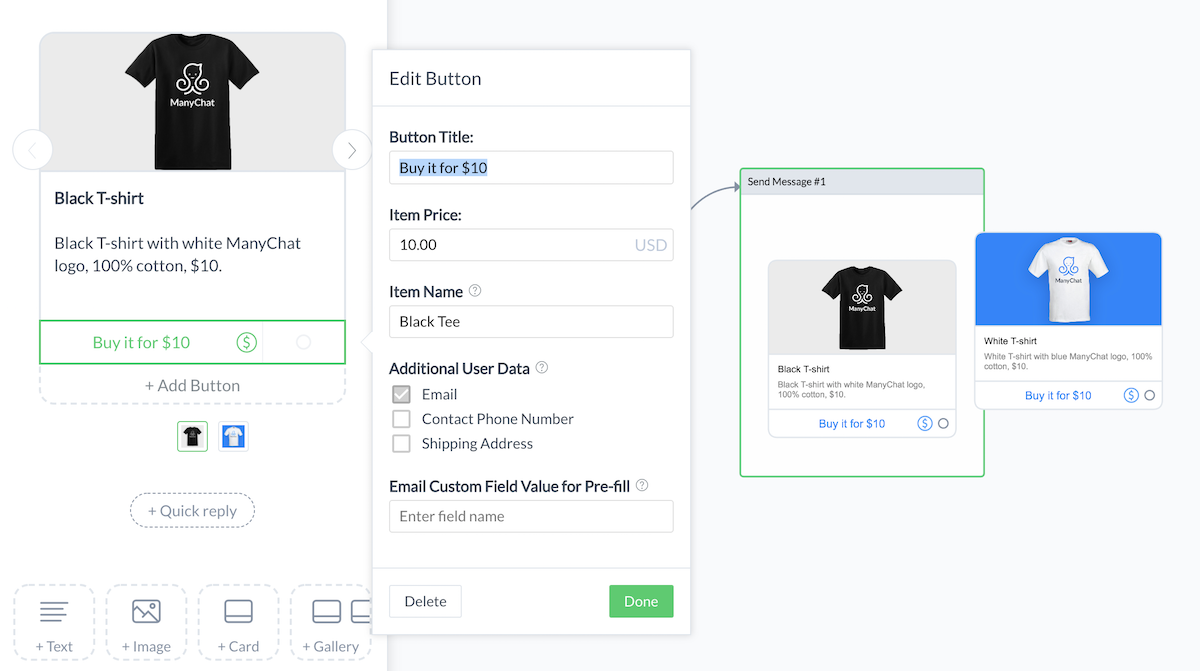
You’ll definitely want to add a great picture of the product to encourage Facebook payments — people can’t buy what they can’t see!
You can also change the button title, the price, and the item name (note: the item name will show up in your order history, but the customers won’t see it). The cool thing is you can automatically save an email address provided during the purchase into your Custom user Field and attach Actions that will be triggered after the successful purchase:
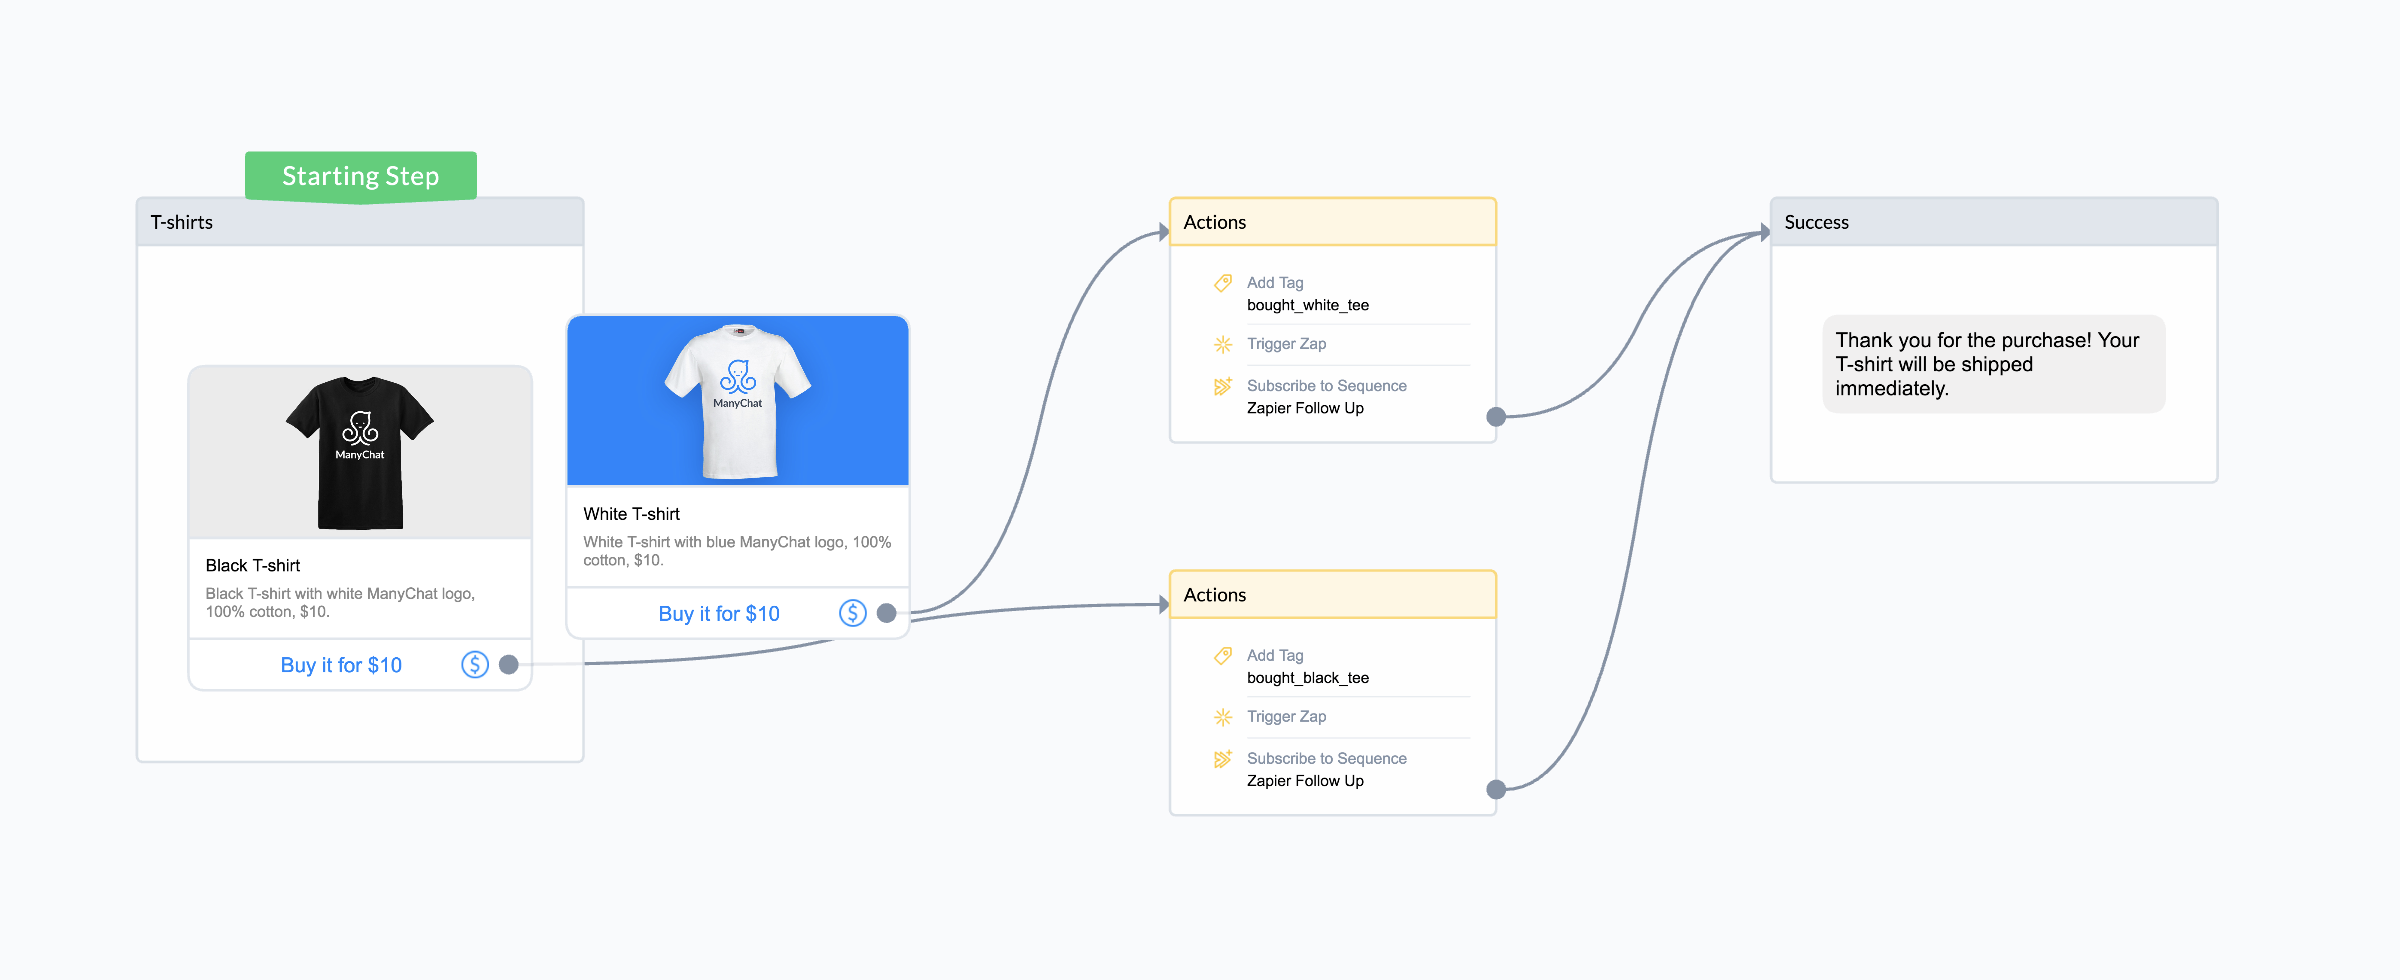
You can use one or more Actions in your Action Step to add a Tag, trigger a Zap or subscribe them to a Sequence:
You can also select which user data you need to request to complete the purchase. For instance, physical products will need an address for shipping. An email address will be requested by default.
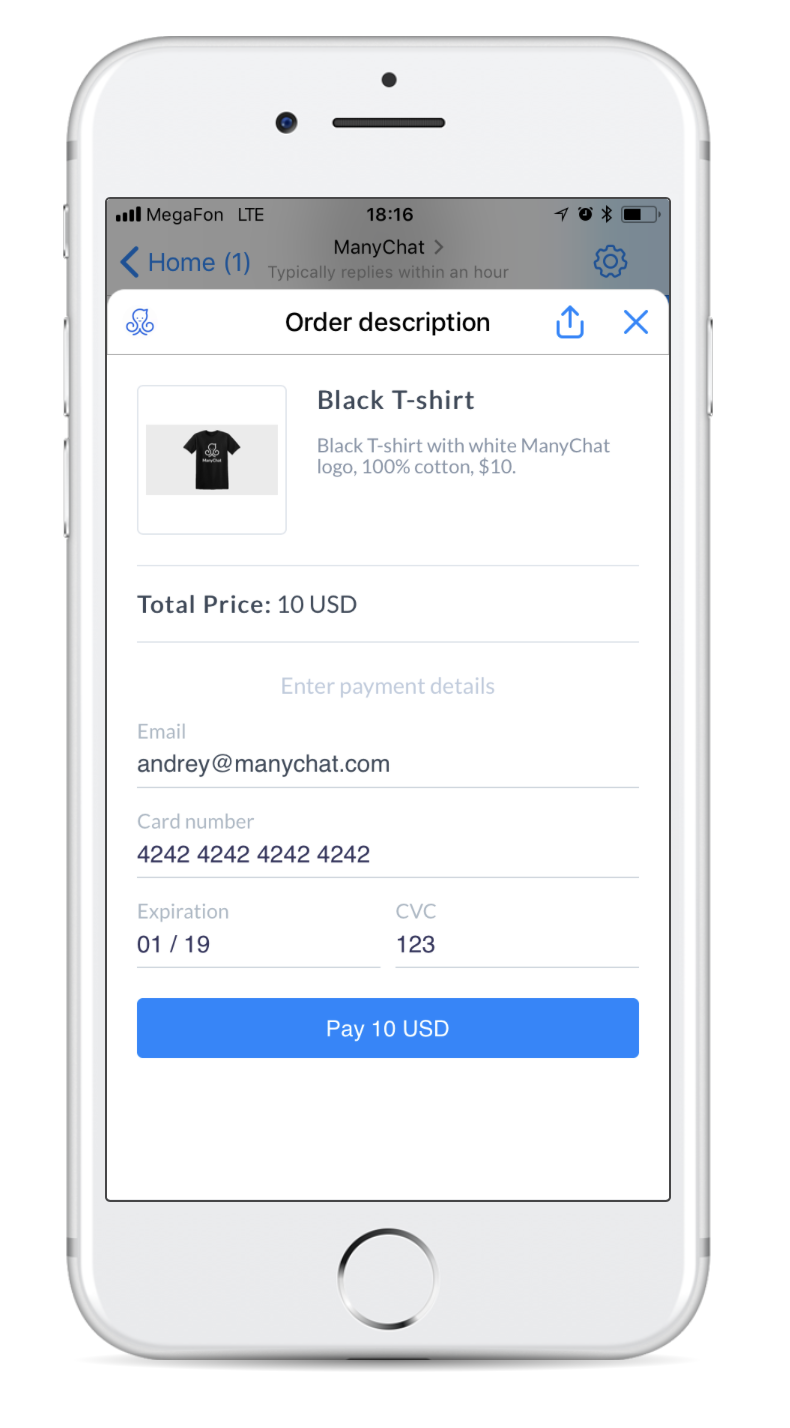
When your user clicks on the buy button, they’ll see a screen like this:
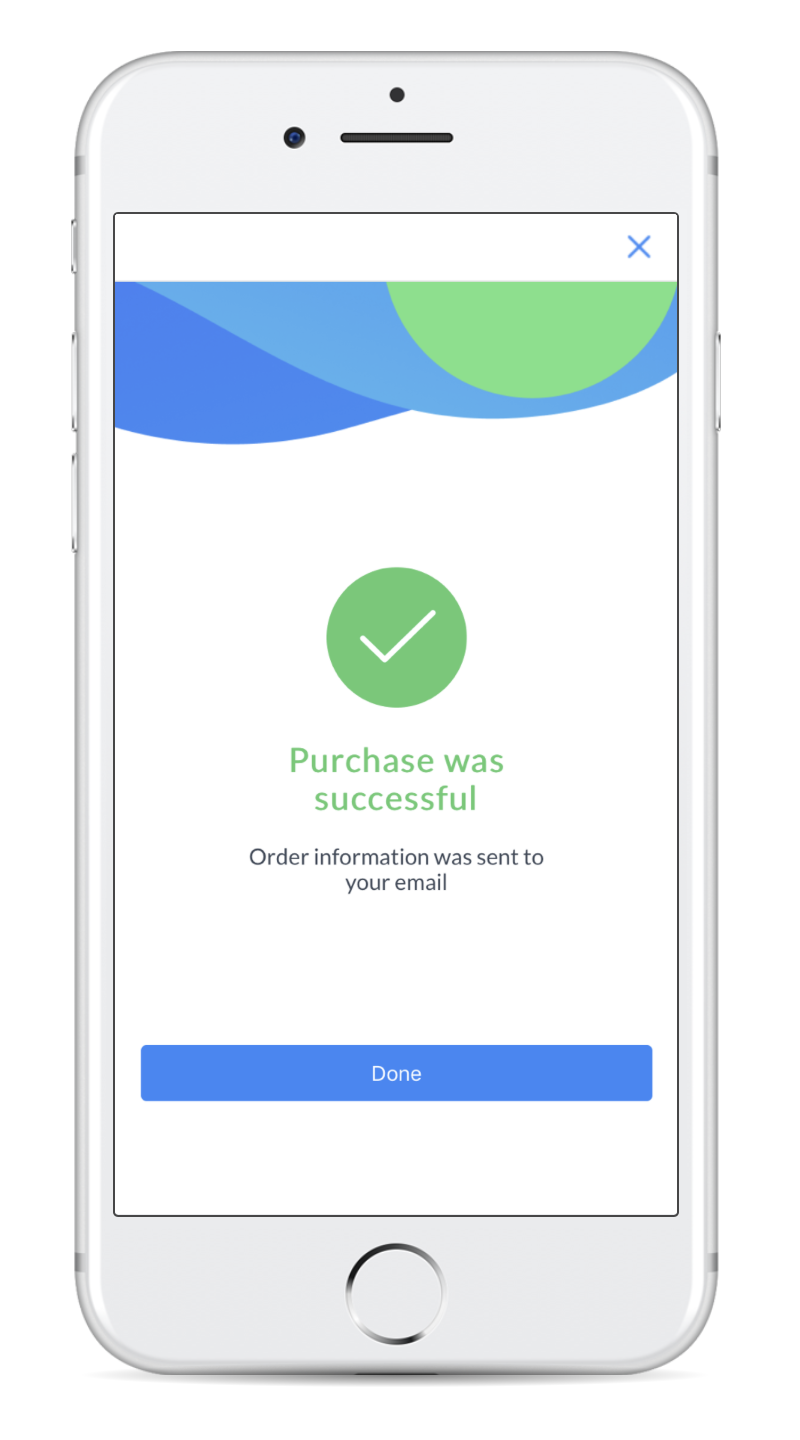
And after they successfully submit their payment, the user will receive a confirmation message telling them their purchase was successful:
And that’s all there is to it!
[Get started with ManyChat now and put this into action: Sign up here!]
Of course, you’ll probably want to build out your flow to make your customers’ shopping experience as helpful and informative as possible. Give them the payment option to upgrade or customize their order, let them know how and when they will receive their product, and answer any other questions your customers are likely to have.
And speaking of questions…
Facebook Payments for ManyChat Q&A
Here are a few of the more common questions we’ve received so far:
What currencies do you support?
Now we support EUR, USD and GBP currencies.
Do you charge any fees?
ManyChat doesn’t charge any additional fee for using Payments feature. Please, keep in mind, that Stripe charges each transaction. More details here https://stripe.com/us/pricing
What products can I and can’t I sell using Messenger Payments in ManyChat?
Since your bot operates in Facebook Messenger, we recommend you to comply with Facebook account rules https://www.facebook.com/policies/commerce)
Is it possible to purchase more than one product at a time?
Right now, customers can only purchase one product at a time. Shopping cart and other cool features may come in the future. Stay tuned, we can add even more useful functionality down the road.
What can I do with a successful step?
After the successful purchase you can perform different Actions: add Tags, subscribe them to a Sequence, send them content and confirmation messages.
I want to charge recurring payments or fees inside the ManyChat bot. What can I do?
ManyChat Payments feature doesn’t support recurring fees as for now. As a workaround we suggest you to try redirecting you subscribers to Zoho Subscriptions or Infusionsoft. Your subscribers will see these external pages as a nice webview.
Is it possible to trigger a Zapier event from a purchase?
Yes, you can perform different Actions including Trigger Zap Even Action.
Where can I find terms of service for these digital payments?
Check out section 7 of our terms of service.
Why aren’t mobile payment apps such as Apple Pay/Android Pay supported?
Apple/Android Pay are cool features, and they’ll work in a browser, but not directly inside Messenger. Stay tuned, though, because this feature may be supported in the future.
In which countries is Stripe available?
To use Stripe, your business must be based in one of 25 countries. See the full list here https://stripe.com/global
You can also sign up to get notified about your country. Once Stripe is supported in your country, you’ll be able to accept payments from customers anywhere in the world.
[READ NEXT: Use These 5 Chatbot Blueprints to Generate Leads, Customers, and Subscribers With ManyChat]
Facebook Messenger Payment Updates from ManyChat
November 2018
Our latest update to ManyChat Payments allows you to integrate more complex logic in Payments to empower the ecommerce section of your bot!
Dynamic Pricing
Your Buy Button can now have dynamic pricing for charging different amounts. Your subscribers and customers can be charged different amounts based on their individual discount or their status with your company.
Here’s what that looks like in action:
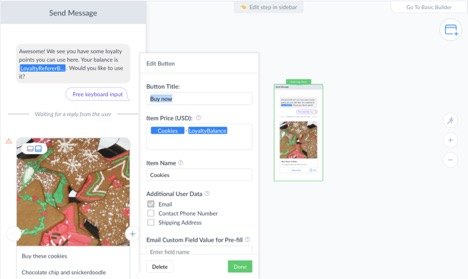
This is a game changer for businesses offering loyalty programs, discounts, and sales!
Here’s how you set this up within ManyChat…
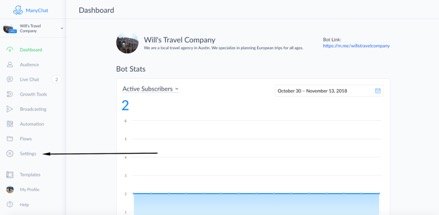
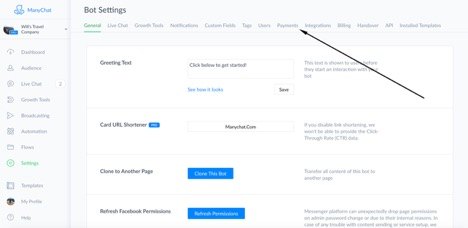
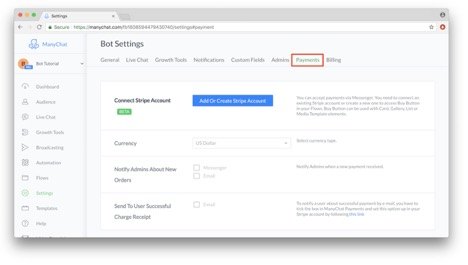
Go to Settings on the left hand side and then to the Payments tab and connect or follow the instructions to create a Stripe account…
And this is just the tip of the iceberg…
Custom Formula
Using Custom Formula in Buy Button allows you to create a simple shopping cart inside the bot — your customers can add different items in their Custom Fields and you just need to sum up all their values at checkout.
The first step to create a shopping cart within the buy button is to create at least two numeric custom fields and user inputs to collect their order number.
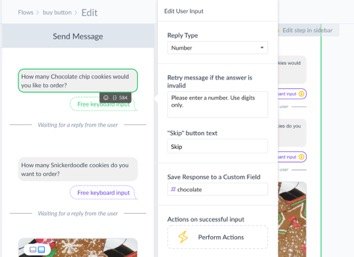
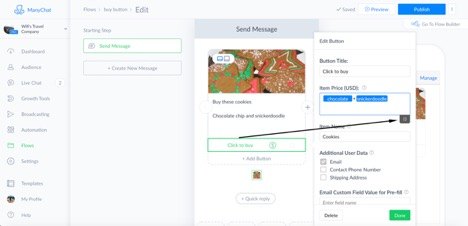
After you set up those two or more custom fields and user inputs, you can add in the buy button to any flow in a card or image gallery and calculate the final item price by creating a custom formula under Item Price
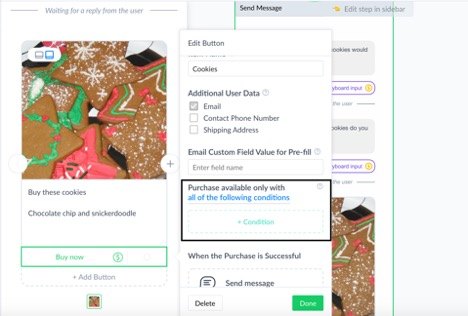
This update also allows you to use Conditions in Buy Button to limit the purchase in case they don’t match. It helps you to track the number of items and stop selling once they’re out of stock.
July 2018
We’ve heard your requests and today we’re rolling out a few updates to ManyChat Payments!
Here’s what you now have access to:
- We’ve added more Currencies (NZD, MXN, CHF, DKK, NOK, SGD, SEK)
- We’ve added maximum and minimum price value for every supported currency
- We’ve added decimal value in prices, for example, you can now sell your products for $14.99
What would you like to see from us next? Post in the comments below!
What you can do with ManyChat and Facebook Messenger payments
During Closed Beta, we empowered Payments feature abilities based on feedback from Messenger users. Since now you’ll be able to:
- Use test credit card payment to test your flows (use 4242 4242 4242 4242 as your card number to make a test purchase)
- Pre-fill email in the payment method details tab from their Custom User Field
- Accept payments from subscribers without leaving Facebook Messenger
- Confirm a payment (automatic in-bot confirmation, email)
- Get notifications on successful payments
- See the list of successful and failed transactions
- Contact subscribers after their purchase (both failed and successful)
- Attach Actions based on the successful purchase (add Tags, send content, subscribe to Sequence etc.).
- One-click payment service with PayPal
⚠ Please keep in mind that the Payment solution is available in a limited number of countries. See the full list here.
Improve your social media marketing with a Messenger payment system
If you’re still unsure about using Facebook Messenger payments, give it a try with ManyChat. Log into your account and try putting up a product for sale in your bot. It’s incredibly quick to set up and the whole process is easy and intuitive.
It’s been said for a long time that Messenger is the marketing channel of the future. Well, today that future is one step closer thanks to the ability to accept money with the help of Messenger payments in your bot.


